Enumerating Accesses
Once you got credentials, the first thing you should do is to confirm accesses and privileges you have over the machines in the internal network, paying special attention to machines where you have any administrative access, or privileges to access it remotely. In Active Directory, the main alternatives for remote access are usually WinRM, RDP and SMB (if you are local administrator).
# SMB: Usually requires you to be local administrator on the machine
nxc smb smbHosts.txt -d '<DOMAIN>' -u <USER> -p <PASSWORD>

# WinRM: The user has to be a member of the Remote Management Users group
nxc winrm smbHosts.txt -d '<DOMAIN>' -u <USER> -p <PASSWORD>

# RDP: The user has to be a member of the Remote Desktop Users group
nxc rdp smbHosts.txt -d '<DOMAIN>' -u <USER> -p <PASSWORD>
If you have a foothold on any of the AD-Joined machines, this might help going forwards in two main ways:
- To perform AD enumeration from inside a Windows machine;
- Doing Local Privilege Escalation inside that machine, gaining higher privileges, and gathering sensitive information about the domain (e.g. you may be able to exfiltrate passwords or hashes from other domain users).
Demo on GOAD Lab
nxc winrm smbHosts.txt -d 'north.sevenkingdoms.local' -u 'samwell.tarly' -p 'Heartsbane'

Enumerating Users and Groups
With a valid authentication we can also exfiltrate the full list of Domain Users! This will allow us to do password spraying against them, redo ASREPRoasting but now with all users, and use during the rest of the tests.
We also want to get the most information we can about them, specially groups and privileges they have in the domain, as this will point us in the right direction to focus our efforts (e.g. users in the Domain Administrators group).
Windows
Here are some of the main options to obtain a list of the Domain Users from a Windows machine:
# Built-in option
net user /domain

# When the ActiveDirectory PowerShell Module is installed
Get-ADUser

# PowerView
Get-DomainUser
From that, we can follow to get more information about them. Open the dropdowns you want by clicking in the arrow next to the tool name:
net built-in tool# Information about password requirements
net accounts
# Password and lockout policy
net accounts /domain
# Information about domain groups
net group /domain
# List users with domain admin privileges
net group "Domain Admins" /domain
# List of PCs connected to the domain
net group "domain computers" /domain
# List PC accounts of domains controllers
net group "Domain Controllers" /domain
# User that belongs to the group
net group <domain_group_name> /domain
# List of domain groups
net groups /domain
# All available groups
net localgroup
# List users that belong to the administrators group inside the domain (the group Domain Admins is included here by default)
net localgroup administrators /domain
# Information about a group (admins)
net localgroup Administrators
# Add user to administrators
net localgroup administrators [username] /add
# Get information about a user within the domain
net user <ACCOUNT_NAME> /domain
# List all users of the domain
net user /domain
# Information about the current user
net user %username%
# Get a list of computers
net view
# List of PCs of the domain
net view /domain
PowerShell
ActiveDirectory Module# Get possibly Kerberoastable users by filtering only the ones that have a ServicePrincipalName
Get-ADUser -Filter {ServicePrincipalName -ne "$null"} -Properties ServicePrincipalName
# Enumerate existent groups
Get-ADGroup -Filter * | select name
# See details of a group
Get-ADGroup -Identity "Backup Operators"
# List the members of a group
Get-ADGroupMember -Identity "Backup Operators"
PowerView# Get details for a specific user
Get-DomainUser -Identity <USERNAME> -Domain <DOMAIN> | Select-Object -Property name,samaccountname,description,memberof,whencreated,pwdlastset,lastlogontimestamp,accountexpires,admincount,userprincipalname,serviceprincipalname,useraccountcontrol
# Get info about group memberships
Get-DomainGroupMember -Identity "Domain Admins" -Recurse
# Test if our current user is local admin on another machine
Test-AdminAccess -ComputerName <COMPUTER_NAME>
# Get users with the SPN attribute set (may be Kerberoastable)
Get-DomainUser -SPN -Properties samaccountname,ServicePrincipalName
All this information can also be retrieved using LDAP queries against the DC. Great tools for that are StandIn and ADSearch. Although they are great to perform queries, they also have some built-in options that are usually helpful too:
# -- StandIn --
# LDAP query to get the list of users
StandIn.exe --ldap "(&(objectCategory=person)(objectClass=user))"
# Built-in option to get members of a group
StandIn.exe --group "domain admins"

# -- ADSearch --
# LDAP query to get the list of users
ADSearch.exe --search "(&(objectCategory=person)(objectClass=user))"
# LDAP query to get members of a group
ADSearch.exe --search "(&(objectCategory=group)(cn=Domain Admins))" --attributes cn,member --domain techcorp.local
Here is a great resource you can use to get a buunch of information from LDAP:
Demo on GOAD Lab
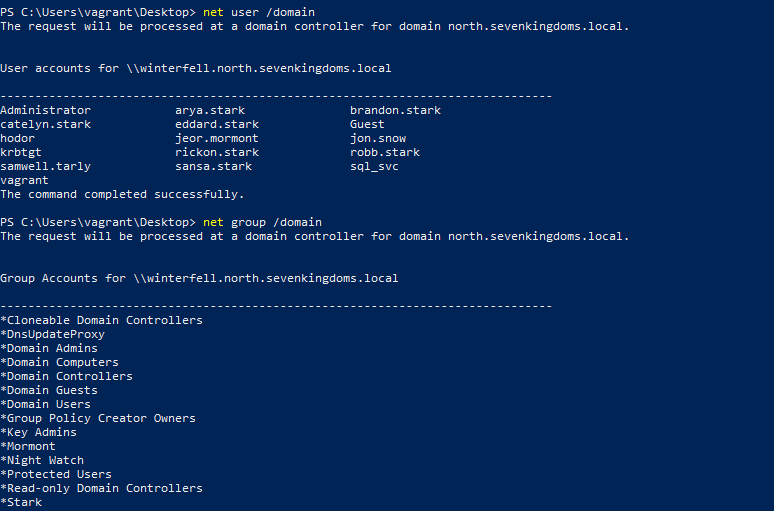
net user /domain
net group /domain
Linux
Here are some of the main options to obtain a list of the Domain Users, and a list of groups, using Linux tools:
# Netexec / Crackmapexec - Users and Groups
nxc smb <DC_IP> -d '<DOMAIN>' -u '<USERNAME>' -p '<PASSWORD>' --users
nxc smb <DC_IP> -d '<DOMAIN>' -u '<USERNAME>' -p '<PASSWORD>' --groups

# Impacket - Users
impacket-GetADUsers -all <DOMAIN>/<USER>:<PASSWORD>

# RPC - Users and Members of a Group
net rpc group members 'Domain Users' -W '<DOMAIN>' -I <DC_IP> -U '%'
net rpc group members '<GROUP_NAME>' -W '<DOMAIN>' -I <DC_IP> -U '%'

# LDAP - Users, Groups and Members of a Group
ldapsearch -H ldap://<DC_IP> -D "<USER>@<DOMAIN>" -w <PASSWD> -b 'DC=<DOMAIN_FIRST>,DC=<DOMAIN_SECOND>,DC=<DOMAIN_THIRD>' "(&(objectCategory=person)(objectClass=user))" | grep 'distinguishedName:'
ldapsearch -H ldap://<DC_IP> -D "<USER>@<DOMAIN>" -w <PASSWD> -b 'DC=<DOMAIN_FIRST>,DC=<DOMAIN_SECOND>,DC=<DOMAIN_THIRD>' "(objectCategory=group)" | grep 'cn:'
ldapsearch -H ldap://<DC_IP> -D "<USER>@<DOMAIN>" -w <PASSWD> -b 'DC=<DOMAIN_FIRST>,DC=<DOMAIN_SECOND>,DC=<DOMAIN_THIRD>' "(&(objectCategory=group)(cn=Domain Admins))"
# Domain FQDN example: for a domain company.local, you should specify DC=company,DC=local
Demo on GOAD Lab
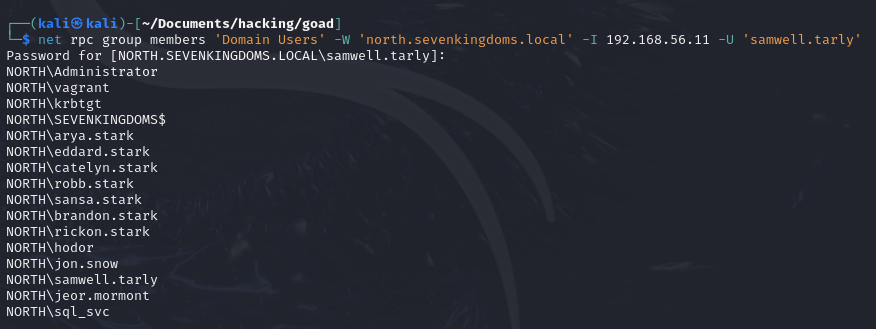
net rpc group members 'Domain Users' -W 'north.sevenkingdoms.local' -I 192.168.56.11 -U 'samwell.tarly'
Enumerating Shares
Shares are another component that usually reveals sensitive and useful information to us. Being so, we should always check the shares our user has access to in the internal machines, and if any of them have any useful content.
Windows
From inside a Windows machine, we can use the net built-in tool to first enumerate the available shares, and then mount them to see their content:
# Check current shares
net share
# Shares on the domains
net view /all /domain[:domainname]
# List shares of a computer
net view <COMPUTER_NAME> /ALL

# Mount the share locally
net use x: \\<COMPUTER_NAME>\\<SHARE_NAME>
Also, Snaffler is a great tool to run to enumerate useful content inside shares, it first enumerates the ones we can connect too, and then tries to identify and tell us files it found inside that might contain interesting information. Here is a simple usage example:
.\Snaffler.exe -d <DOMAIN> -s -v data -o snaffler.log
Demo on GOAD Lab
.\Snaffler.exe -d north.sevenkingdoms.local -s -v data -o snaffler.log

Linux
From a Linux perspective, there are different tools we can use. I usually start with netexec:
# Enumerate shares
nxc smb <TARGET_IP> -d '<DOMAIN>' -u '<USERNAME>' -p '<PASSWORD>' --shares

# List all the content inside a specific share
nxc smb <TARGET_IP> -d '<DOMAIN>' -u '<USERNAME>' -p '<PASSWORD>' --shares -M spider_plus --share '<SHARE_NAME>'
When that doesn’t work out very well, or the output is too messy, then I just use smbclient, which is a more manual way to enumerate:
# Enumerate Shares
smbclient -L //<IP>/

# Connect to a Share
smbclient //<IP>/<SHARE> -W <DOMAIN> -U <USER> --password=<PASSWORD>

# From inside you can run simple commands, like help, ls, cd...
Other useful things you can do:
# -- SMBMap --
# Enumerate available shares
smbmap -u <USER> -p <PASSWORD> -d <DOMAIN> -H <TARGET_IP>
# Recursive listing of the available directories on a share
smbmap -u <USER> -p <PASSWORD> -d <DOMAIN> -H <TARGET_IP> -R '<SHARE>' --dir-only

# Mount a share you have access to, it becomes much easier to navigate
sudo apt install cifs-utils
sudo mkdir /mnt/<SHARE_NAME>
sudo mount -t cifs -o 'username=<USERNAME>,password=<PASSWORD>' //<TARGET_IP>/<SHARE> /mnt/<SHARE>
# Or sudo mount.cifs //<IP>/<SHARE> /mnt/<DIR_TO_MOUNT_ON>/ user=<USERNAME>,pass=<PASSWORD>
Demo on GOAD Lab
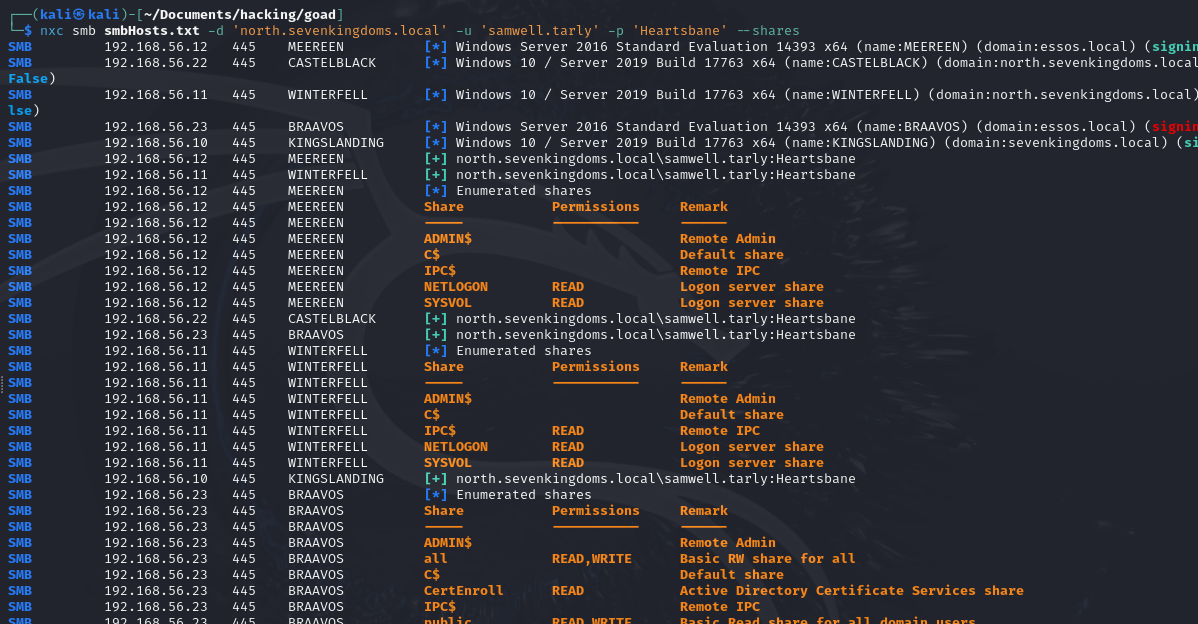
nxc smb smbHosts.txt -d 'north.sevenkingdoms.local' -u 'samwell.tarly' -p 'Heartsbane' --shares
BloodHound
If the assessment doesn’t require stealth, then one of the best ways for us to enumerate the environment is with BloodHound, as it recovers almost all crucial information we need by doing a bunch of LDAP queries automatically, and allows us to have a graphic view and control over all the data.
To use BloodHound effectively, you’ll need to collect data from the Active Directory environment using one of the available ingestors. These ingestors gather information about users, groups, computers, and their relationships within the domain. Once the data is collected, you can then import it into the BloodHound GUI for analysis and visualization.
Windows Ingestor
For Windows environments, you can use the SharpHound ingestor, which can be downloaded directly from BloodHound’s repository (Careful, the latest versions from the SharpHound repo are incompatible with the old BloodHound, so use the one I said). Here’s an example command to run SharpHound:
SharpHound.exe --CollectionMethods All --Domain <DOMAIN> --domaincontroller <DC_IP> --zipfilename <OUT_NAME>

# You may use the --ExcludeDCs option so it doesn't query the DC and avoid generating that many alerts
SharpHound is also available as a PowerShell module (SharpHound.ps1), here is the syntax if you want to run in it this way:
# Import it
. .\SharpHound.ps1
# Running
Invoke-BloodHound -CollectionMethod All -Domain <DOMAIN> -ZipFileName <OUTPUT_FILE>.zip
For more information about the flags it accepts, here you go:
- https://redfoxsec.com/blog/bloodhound-cheat-sheet/
- https://bloodhound.readthedocs.io/en/latest/data-collection/sharphound-all-flags.html
Demo on GOAD Lab
.\SharpHound.exe --CollectionMethods All --Domain 'north.sevenkingdoms.local' --domaincontroller 192.168.56.11 --zipfilename north_bloodhound

Linux Ingestor
For Linux environments, you can use the BloodHound Python ingestor. This tool allows you to collect Active Directory data from a Linux machine. Here’s an example command to run the BloodHound Python ingestor:
bloodhound-python --zip -c All -d <DOMAIN> -u <USER> -p <PASSWORD> -ns <DNS_SERVER_IP> # The DNS Server is usually the DC
Demo on GOAD Lab
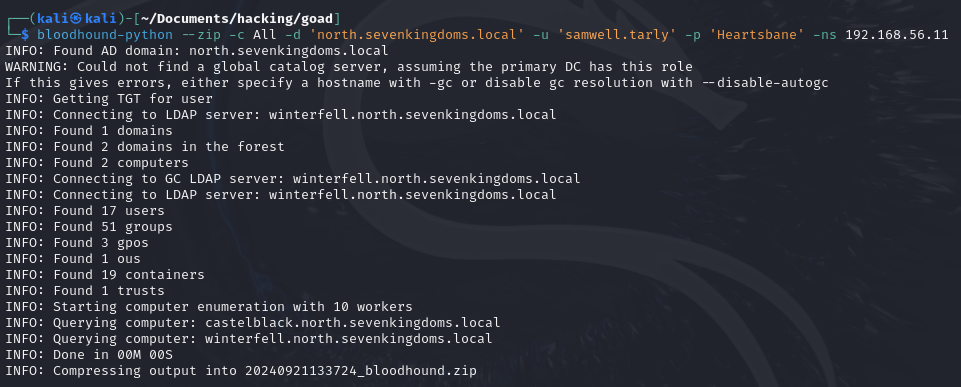
bloodhound-python --zip -c All -d 'north.sevenkingdoms.local' -u 'samwell.tarly' -p 'Heartsbane' -ns 192.168.56.11
BloodHound GUI
After collecting the data using one of the ingestors, you’ll need to import it into the BloodHound GUI for analysis. Launch the BloodHound application and use the “Upload Data” button to import the ZIP file generated by the ingestor. Once imported, you can use BloodHound’s query and visualization features to identify potential attack paths, privilege escalation opportunities, and other security insights within the Active Directory environment.
Simple examples of things you can try:
- Listing all users or groups;
- Checking members of specific AD groups;
- Find all kerberoastable accounts;
- List ACLs and privileges each user has;
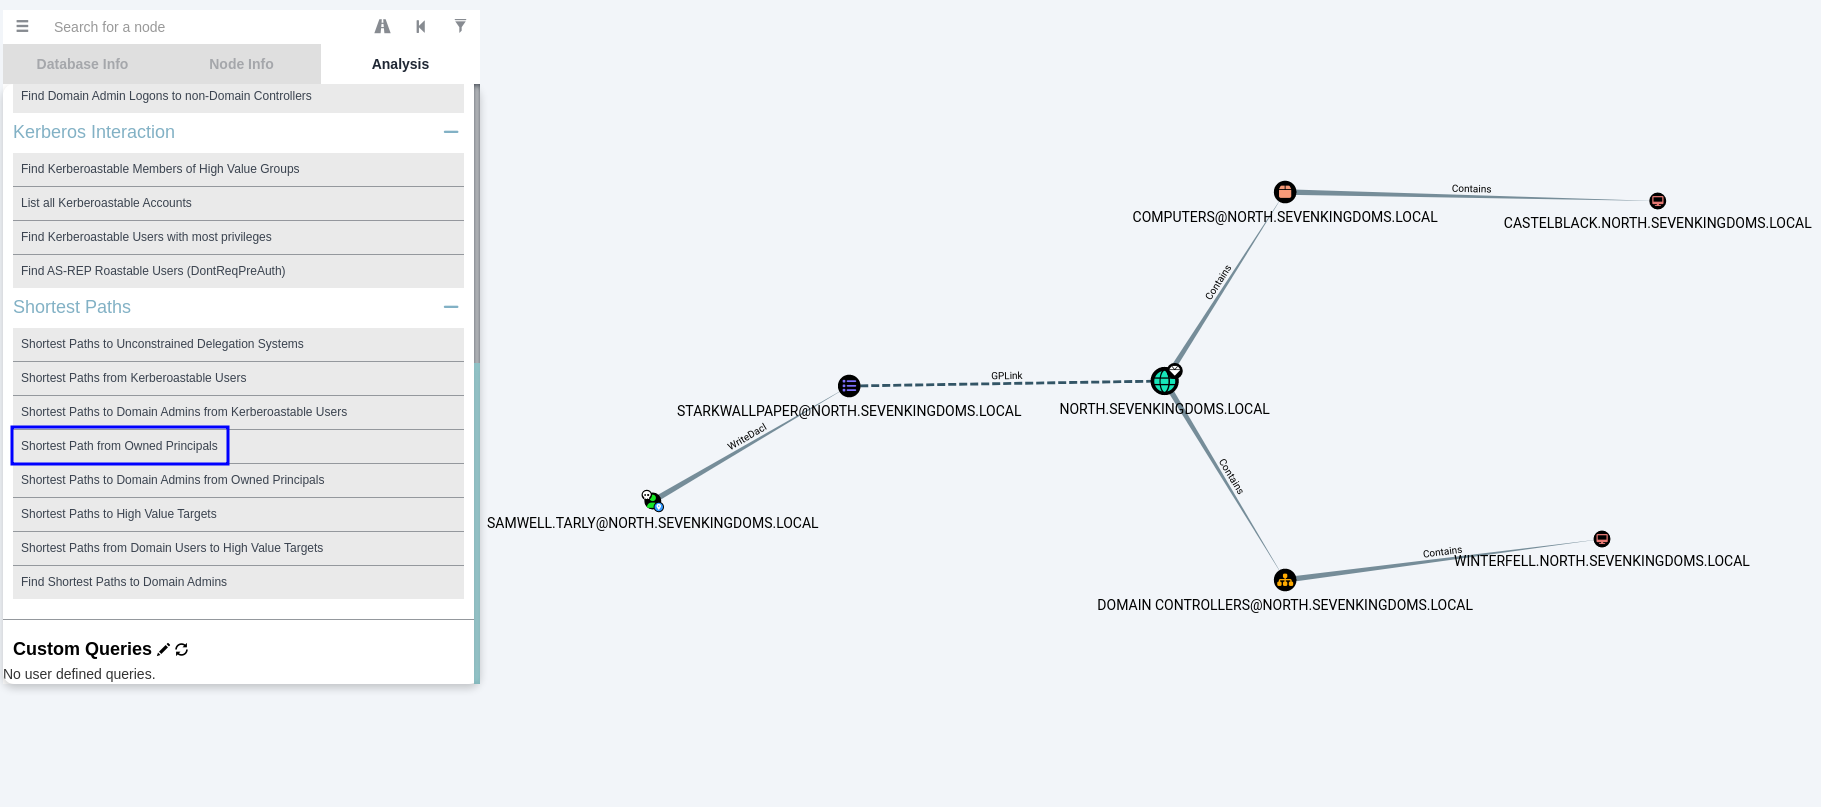
- Track down potential attack paths you can pursue from the principals you already owned.
Here is an example for the BloodHound usage. In this one I marked the users I already had as owned, and used the built-in “Shortest Path from Owned Principals” query:Demo on GOAD Lab
Going Forwards
This article’s focus was to talk about basic enumeration steps we should do when we get credentials, but there are still a looot of additional information that we will need to recover to perform specific attacks. These techniques, however, will be brought when we talk about each of the attacks.